
Comment to DM
Automatically DM people who comment a specific word on your posts.
Comment to DM automatically sends a DM to everyone who comments on your post, such as an e-book link, a promo code, or a price list. It can also reply to the comment automatically, so other people know the DM has been sent.
This guide is for the new dibales.ai dashboard. Still on the old layout? See Comment to DM.
Before you start
- A professional Instagram account (Business or Creator) connected to your agent. If it isn't yet, follow Connect Your Accounts.
- A published post or reel, or choose Next post if you haven't posted it yet.
- What you want to send by DM, such as an e-book link, a promo code, or a price list.
- Another Instagram account to test with, such as your personal account or a friend's. DMs can't be sent to your own account.
How it works
| Steps | What you do |
|---|---|
| 1–3 | Open the menu, choose Start from scratch, and get to know the editor |
| 4–7 | Set up the trigger, comment reply, Opening message, and Main message |
| 8 | Save, and the automation starts right away |
| 9 | Test from another account, then check the result in the Comment log |
1. Open Comment to DM
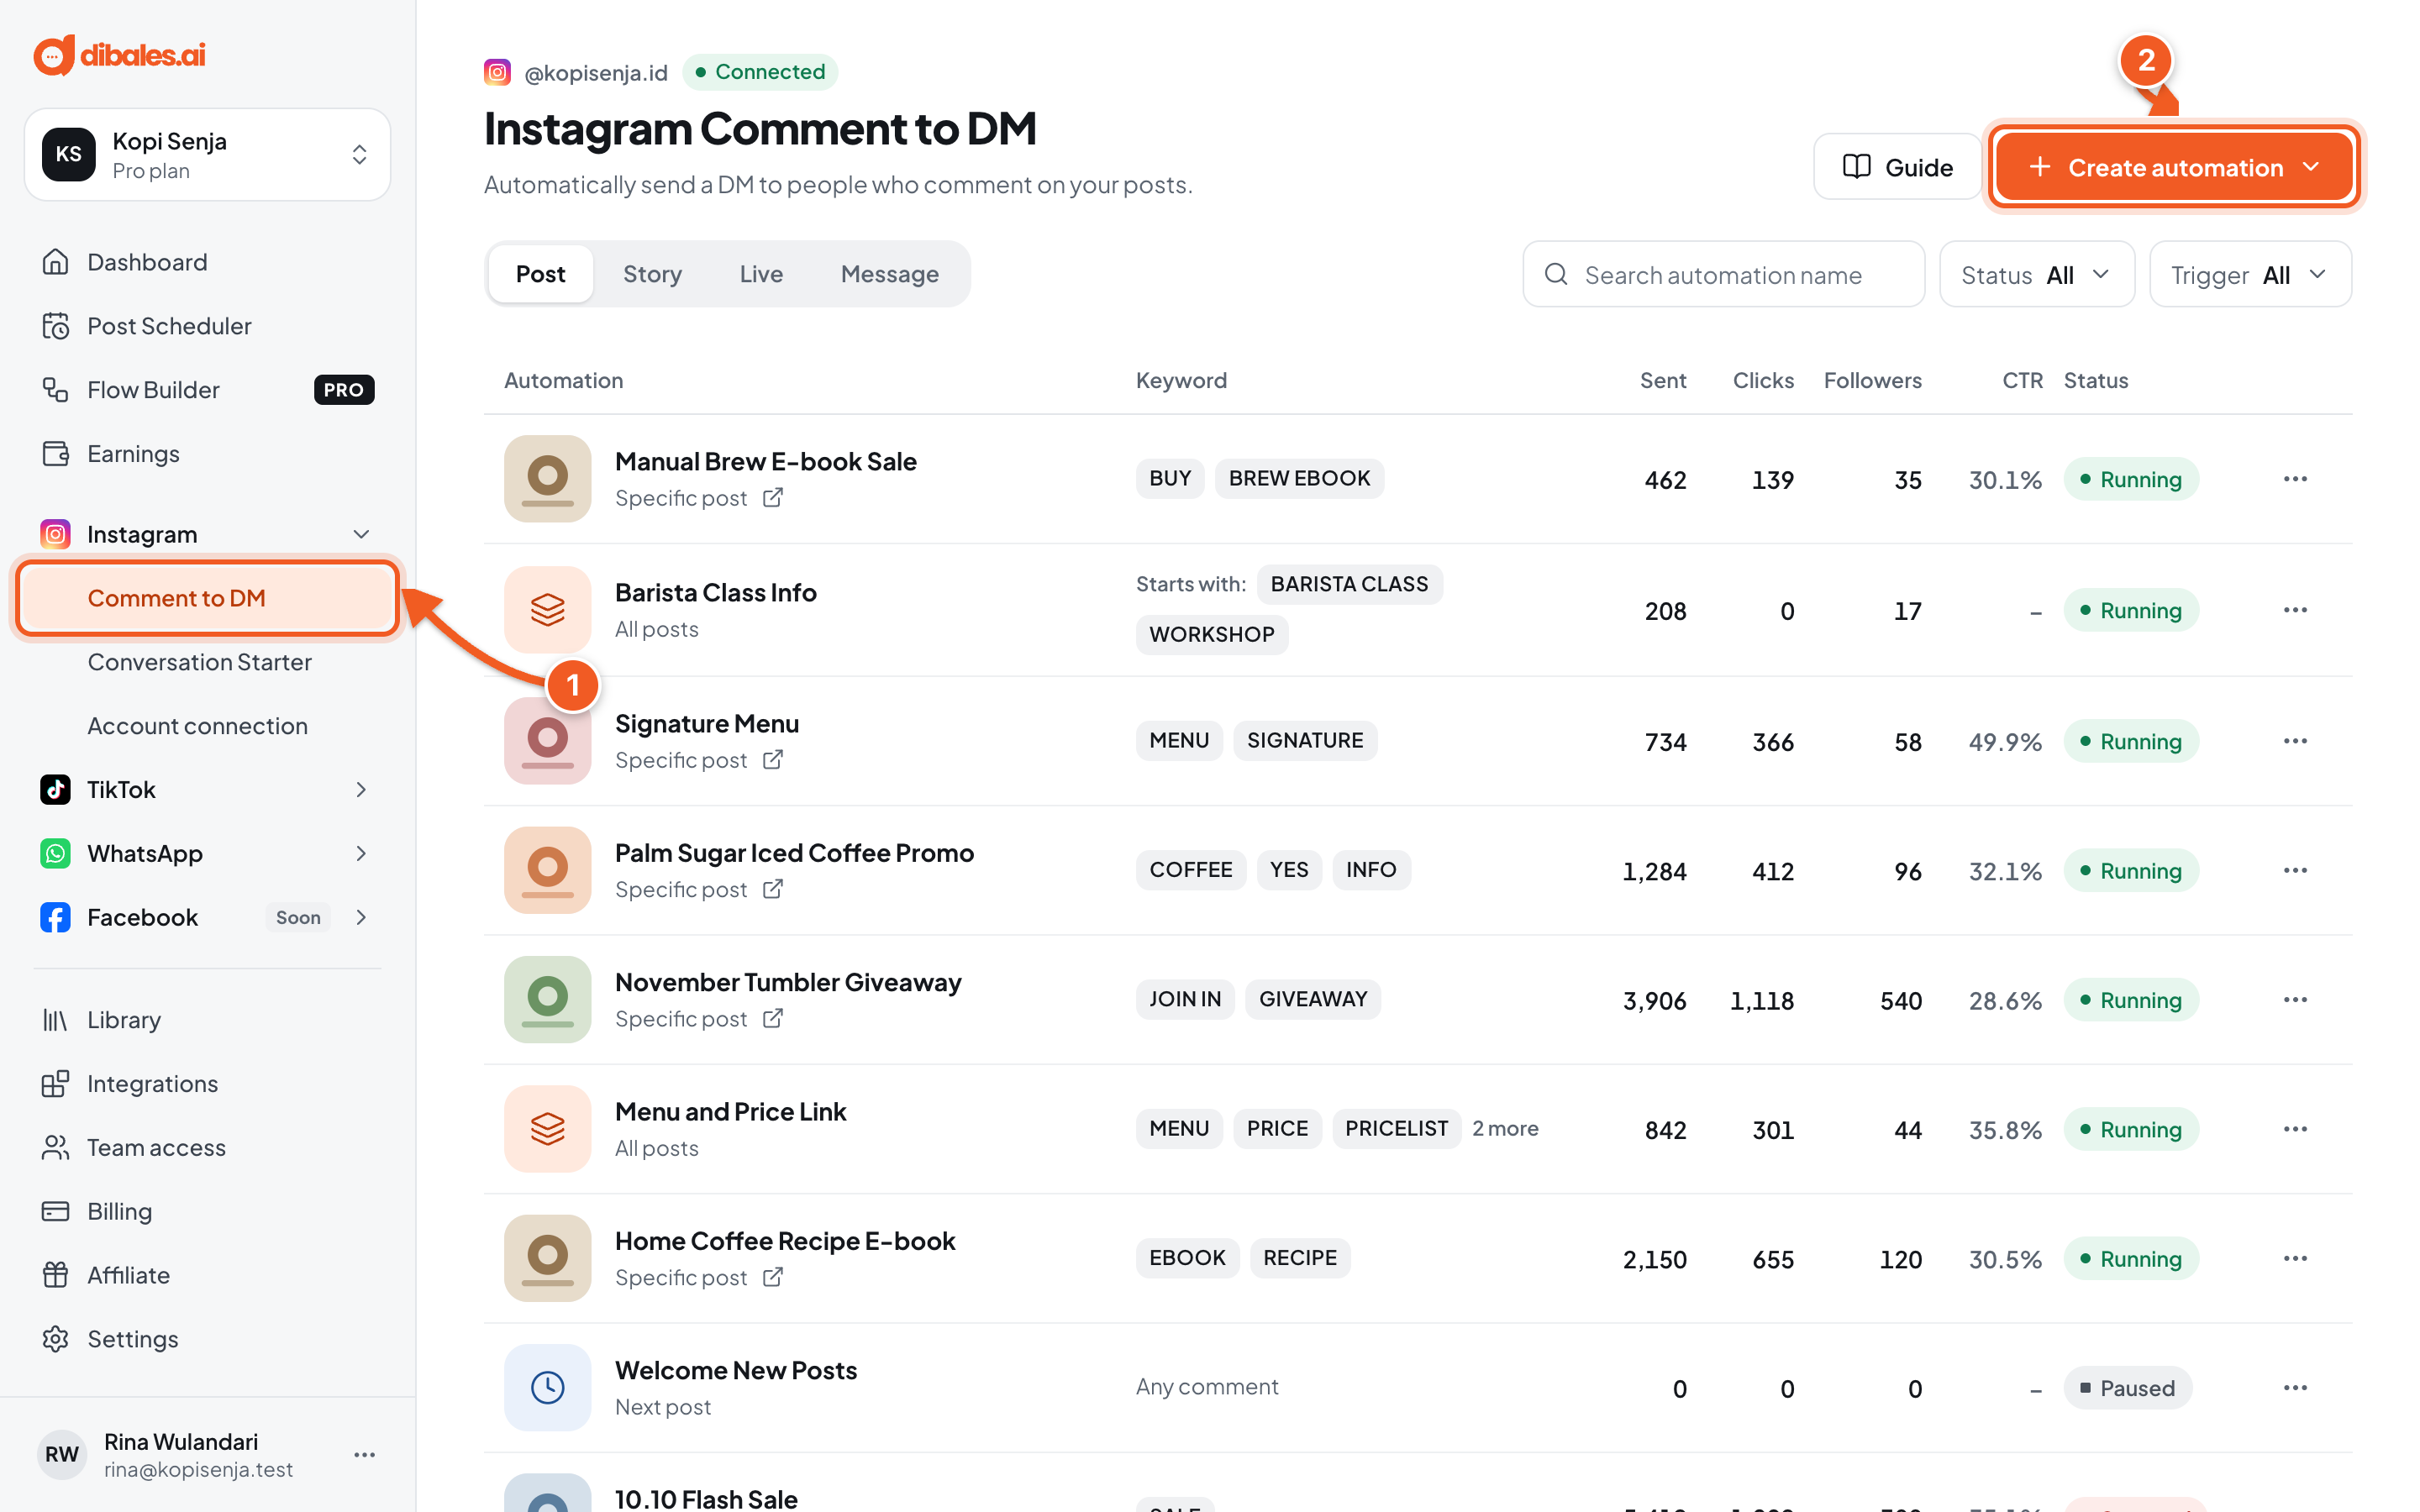
- In the sidebar, open Instagram › Comment to DM. On a phone, open the menu first with the ☰ icon at the top right.
- Click Create automation.
💡 The Post, Story, Live, and Message tabs group automations by source. This guide uses Post.
2. Choose how to start
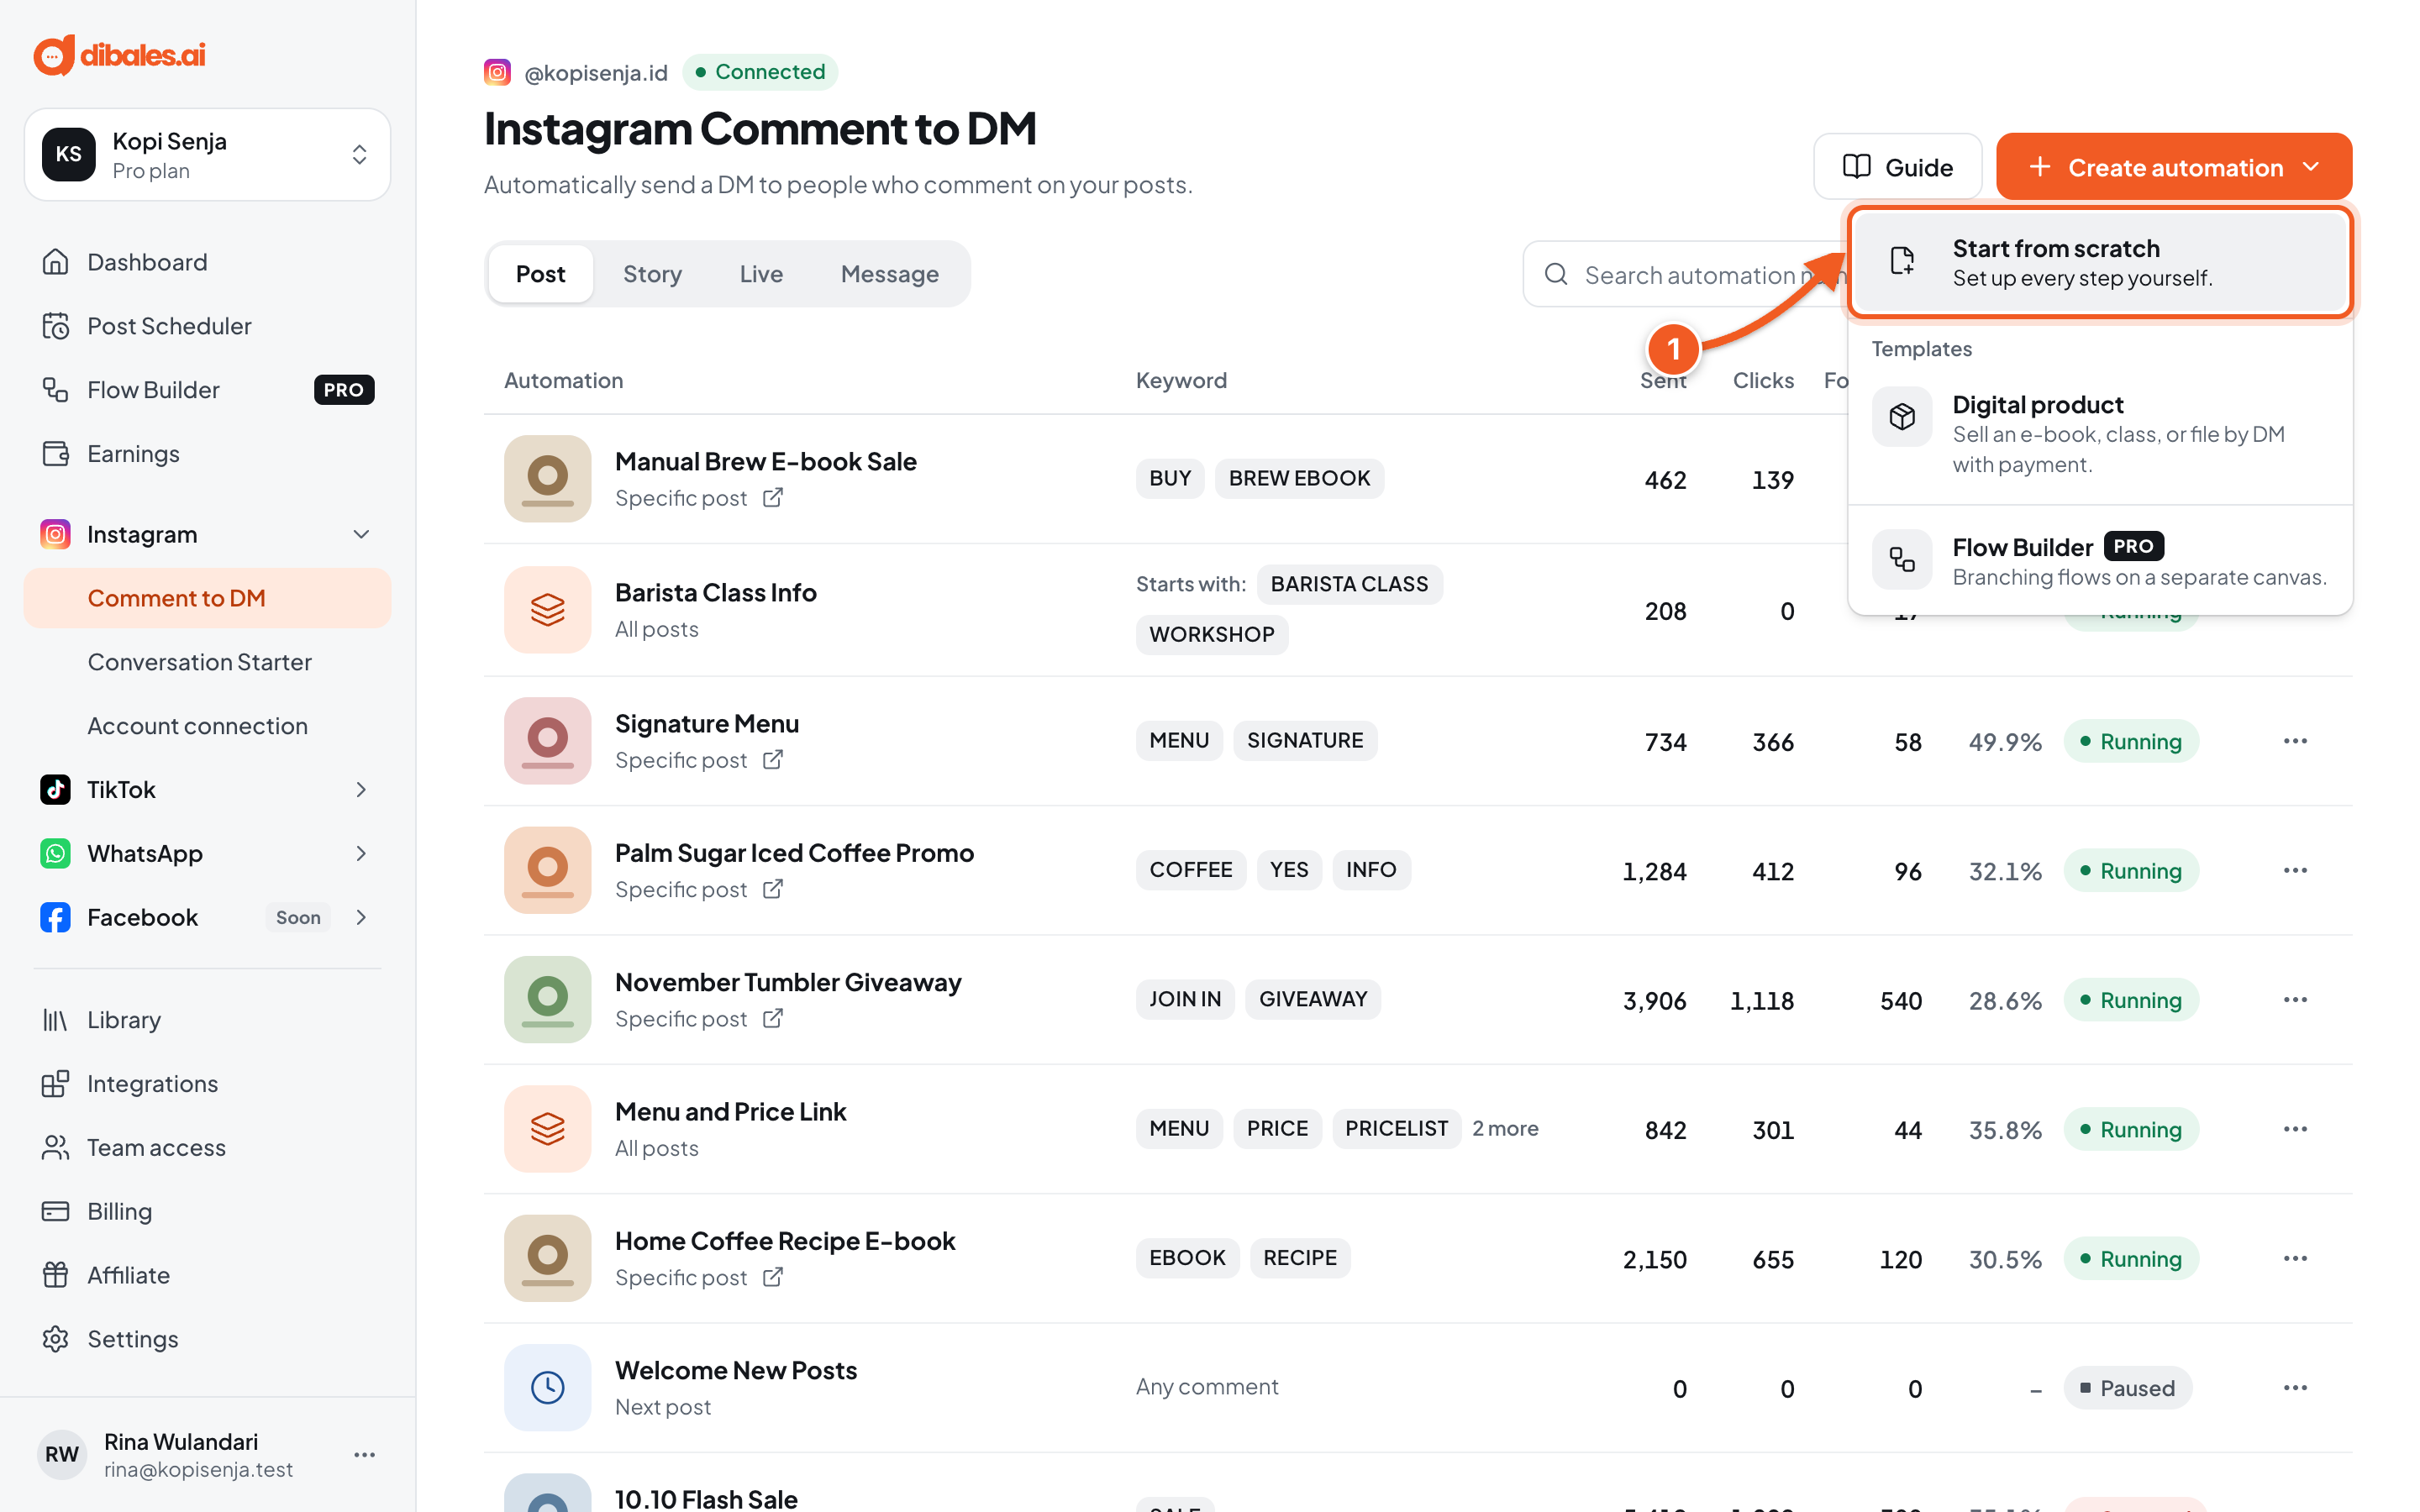
- Choose Start from scratch to set up every step yourself.
The other options:
- Digital product: a template for selling an e-book, class, or file by DM with payment.
- Flow Builder (Pro): branching flows on a separate canvas, see Flow Builder.
3. Get to know the editor
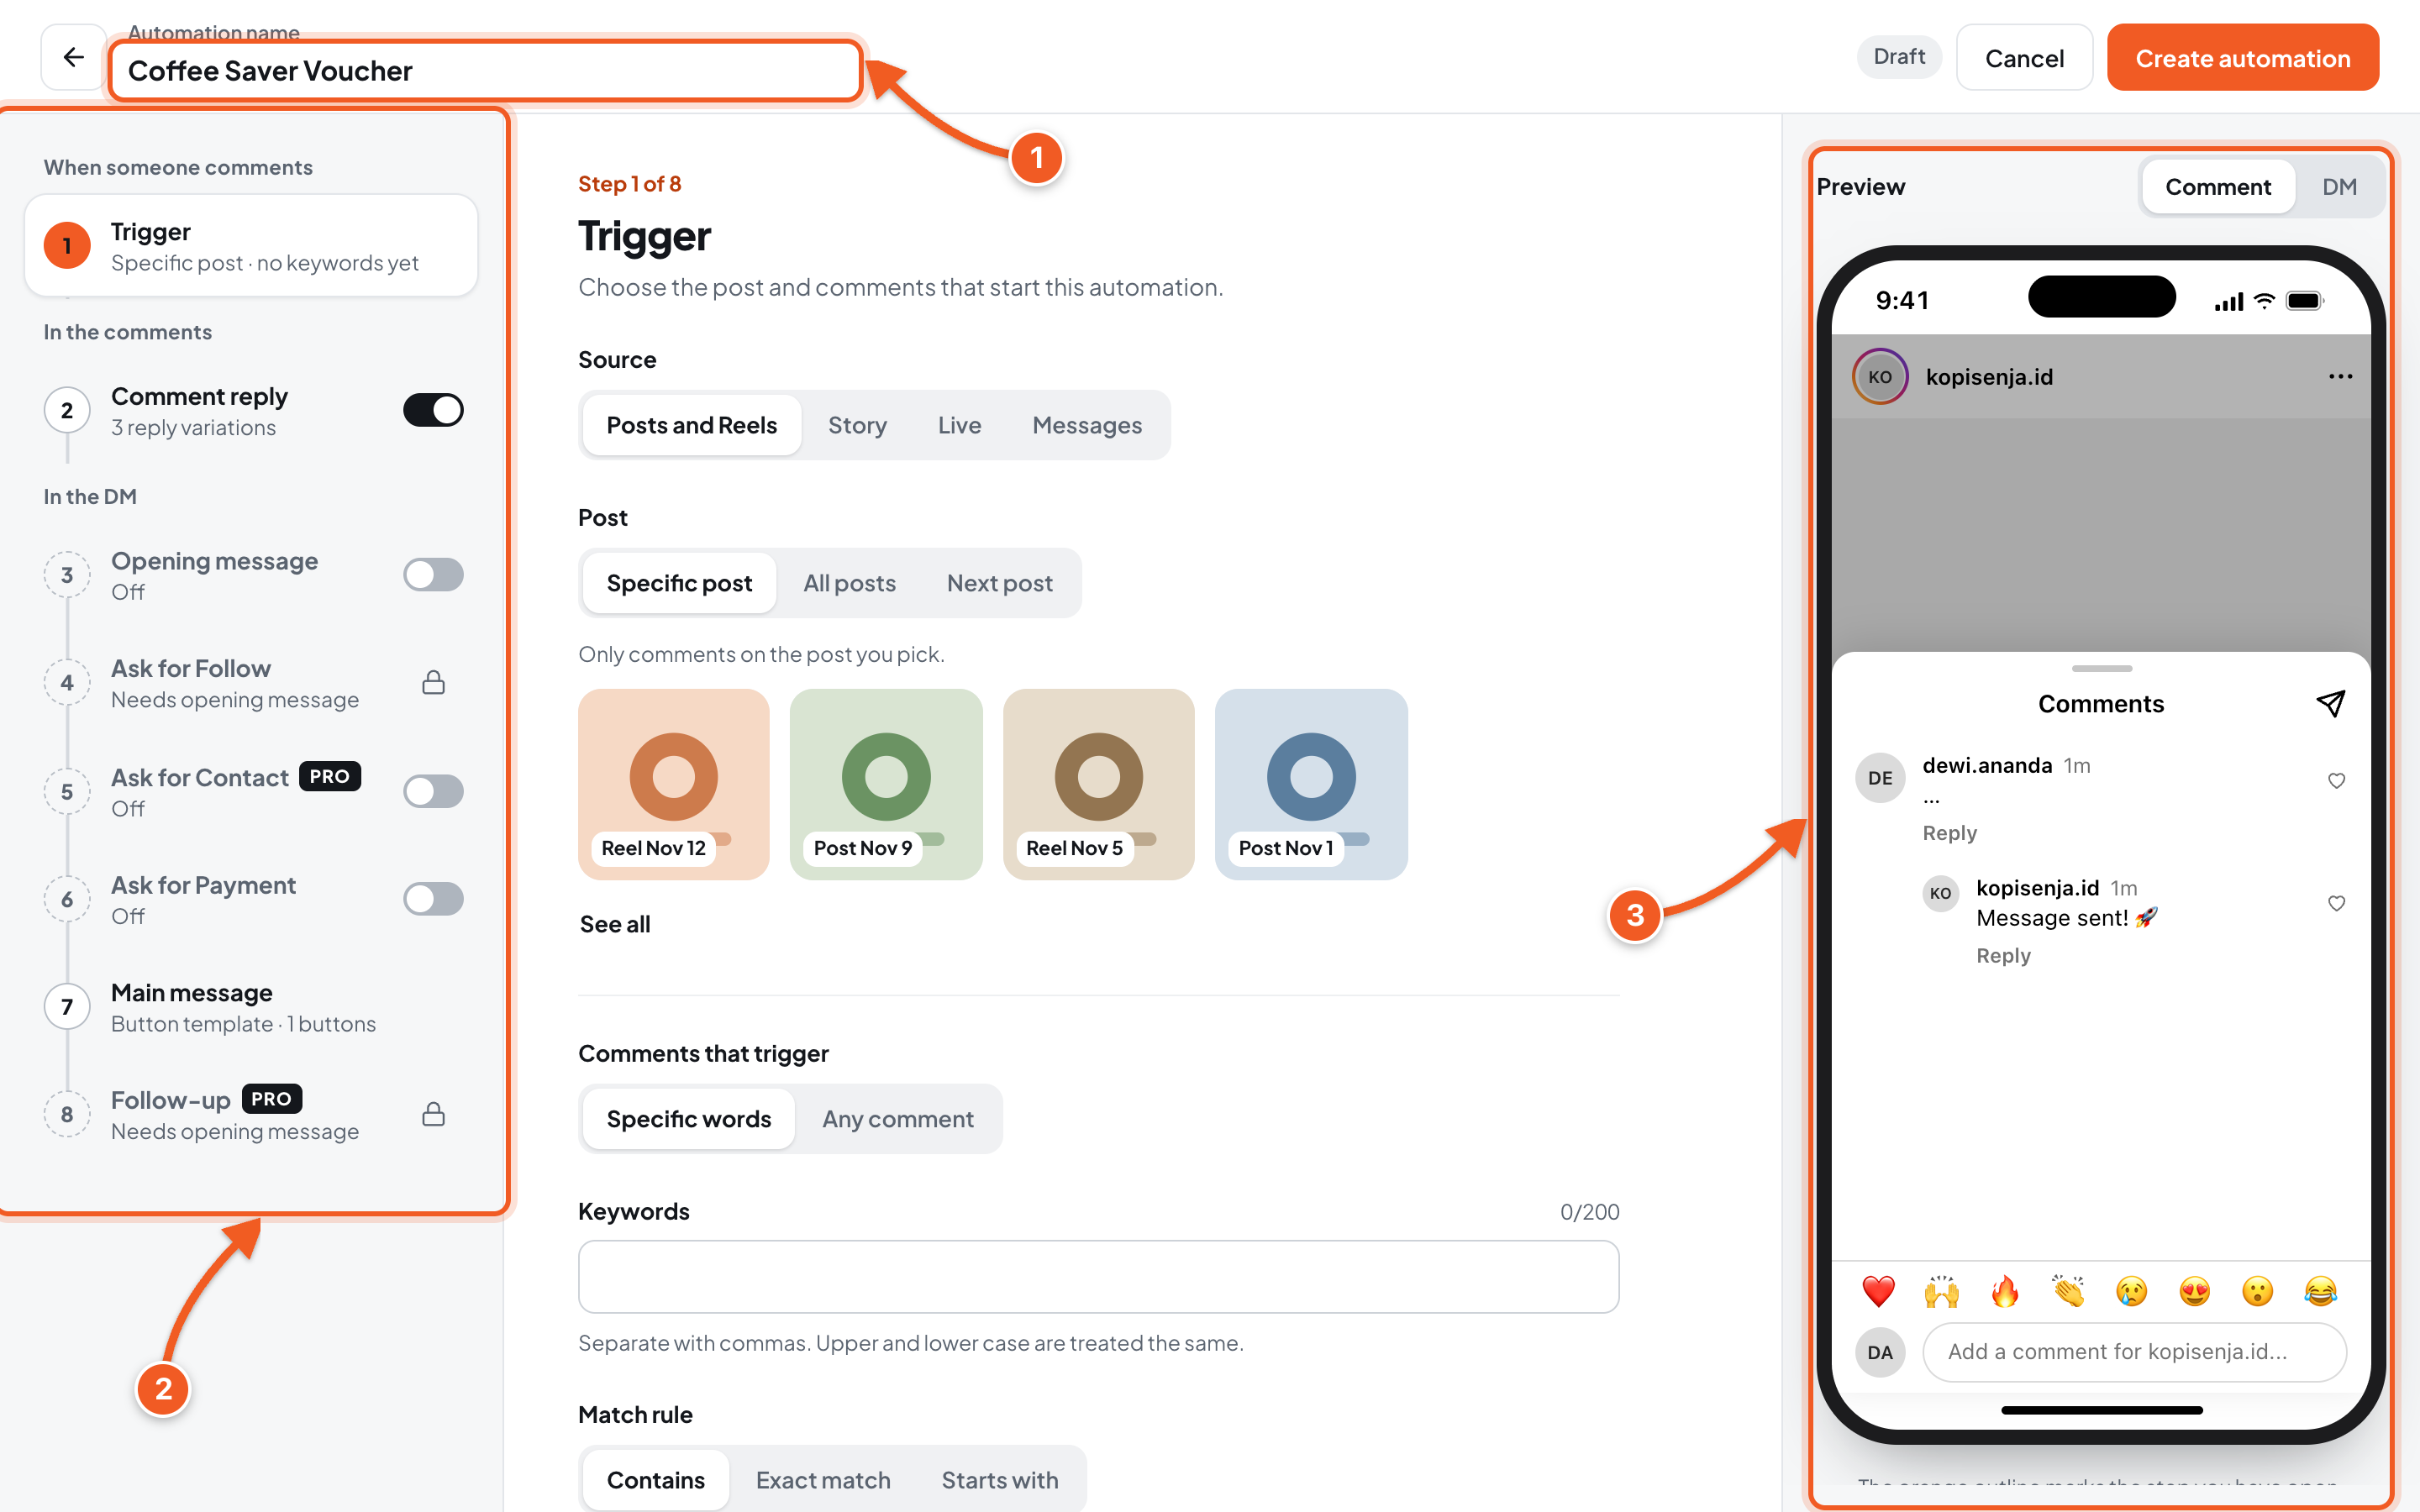
- Automation name: a name just for you, not visible to your audience. For example: Coffee Saver Voucher.
- Step list: the automation flow from top to bottom. Click a step to fill it in. Steps with a switch can be turned on or off, and steps with a lock need another step or the Pro plan.
- Preview: the comment and DM your audience receives, updated as you type. The orange line marks the step you have open.
On a phone, the step list fills the screen. Tap a step to open it, then tap Done to go back. Open the preview with the Preview button at the bottom.
4. Set up the Trigger
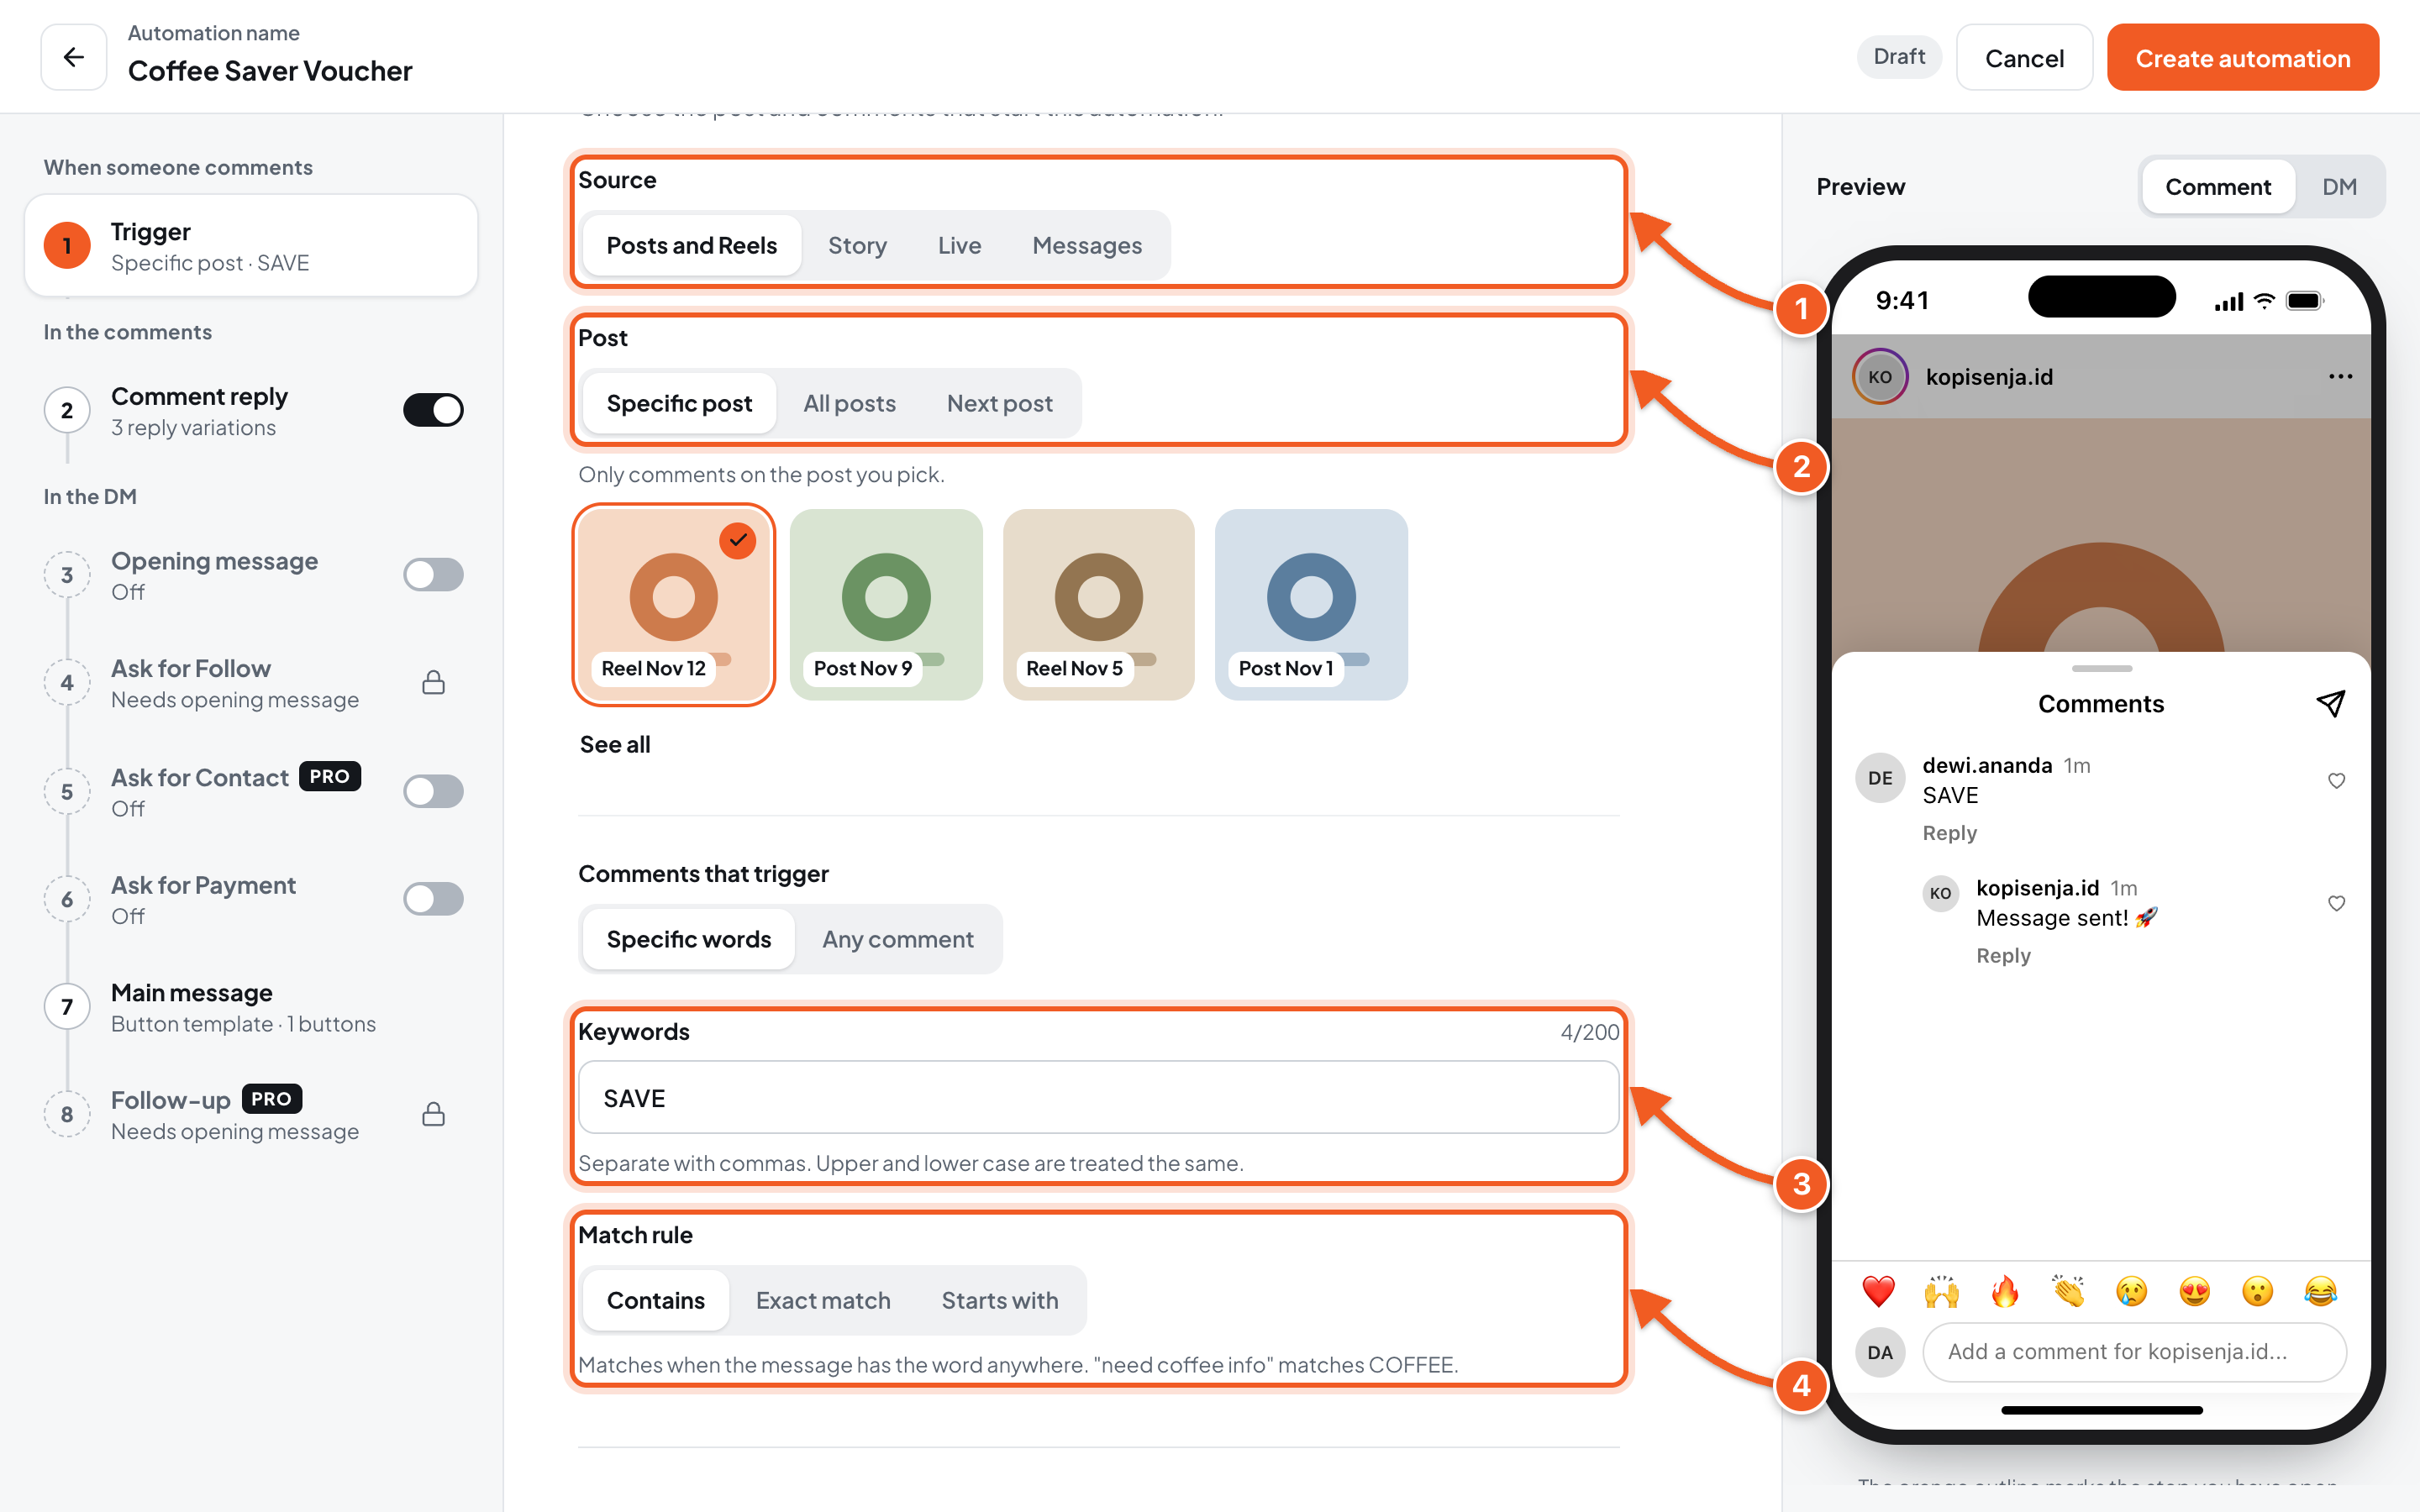
- Source: choose Posts and Reels.
- Post: choose Specific post, then click the post. Click See all if you can't see it. The other options:
- All posts: applies to every post and reel. Automations for a specific post still take priority.
- Next post: waits for a new post, then attaches to it as soon as it gets its first comment.
- Keywords: the word the comment must contain, for example SAVE. Separate several words with commas. Upper and lower case are treated the same. Choose Any comment if every comment should get a reply.
- Match rule:
- Contains: matches when the word appears anywhere. "need coffee info" matches COFFEE.
- Exact match: matches only when the whole comment is that word.
- Starts with: matches when the comment starts with that word.
5. Set up the Comment reply
This step is already on, with 3 sample replies. You can use them as they are or replace them.
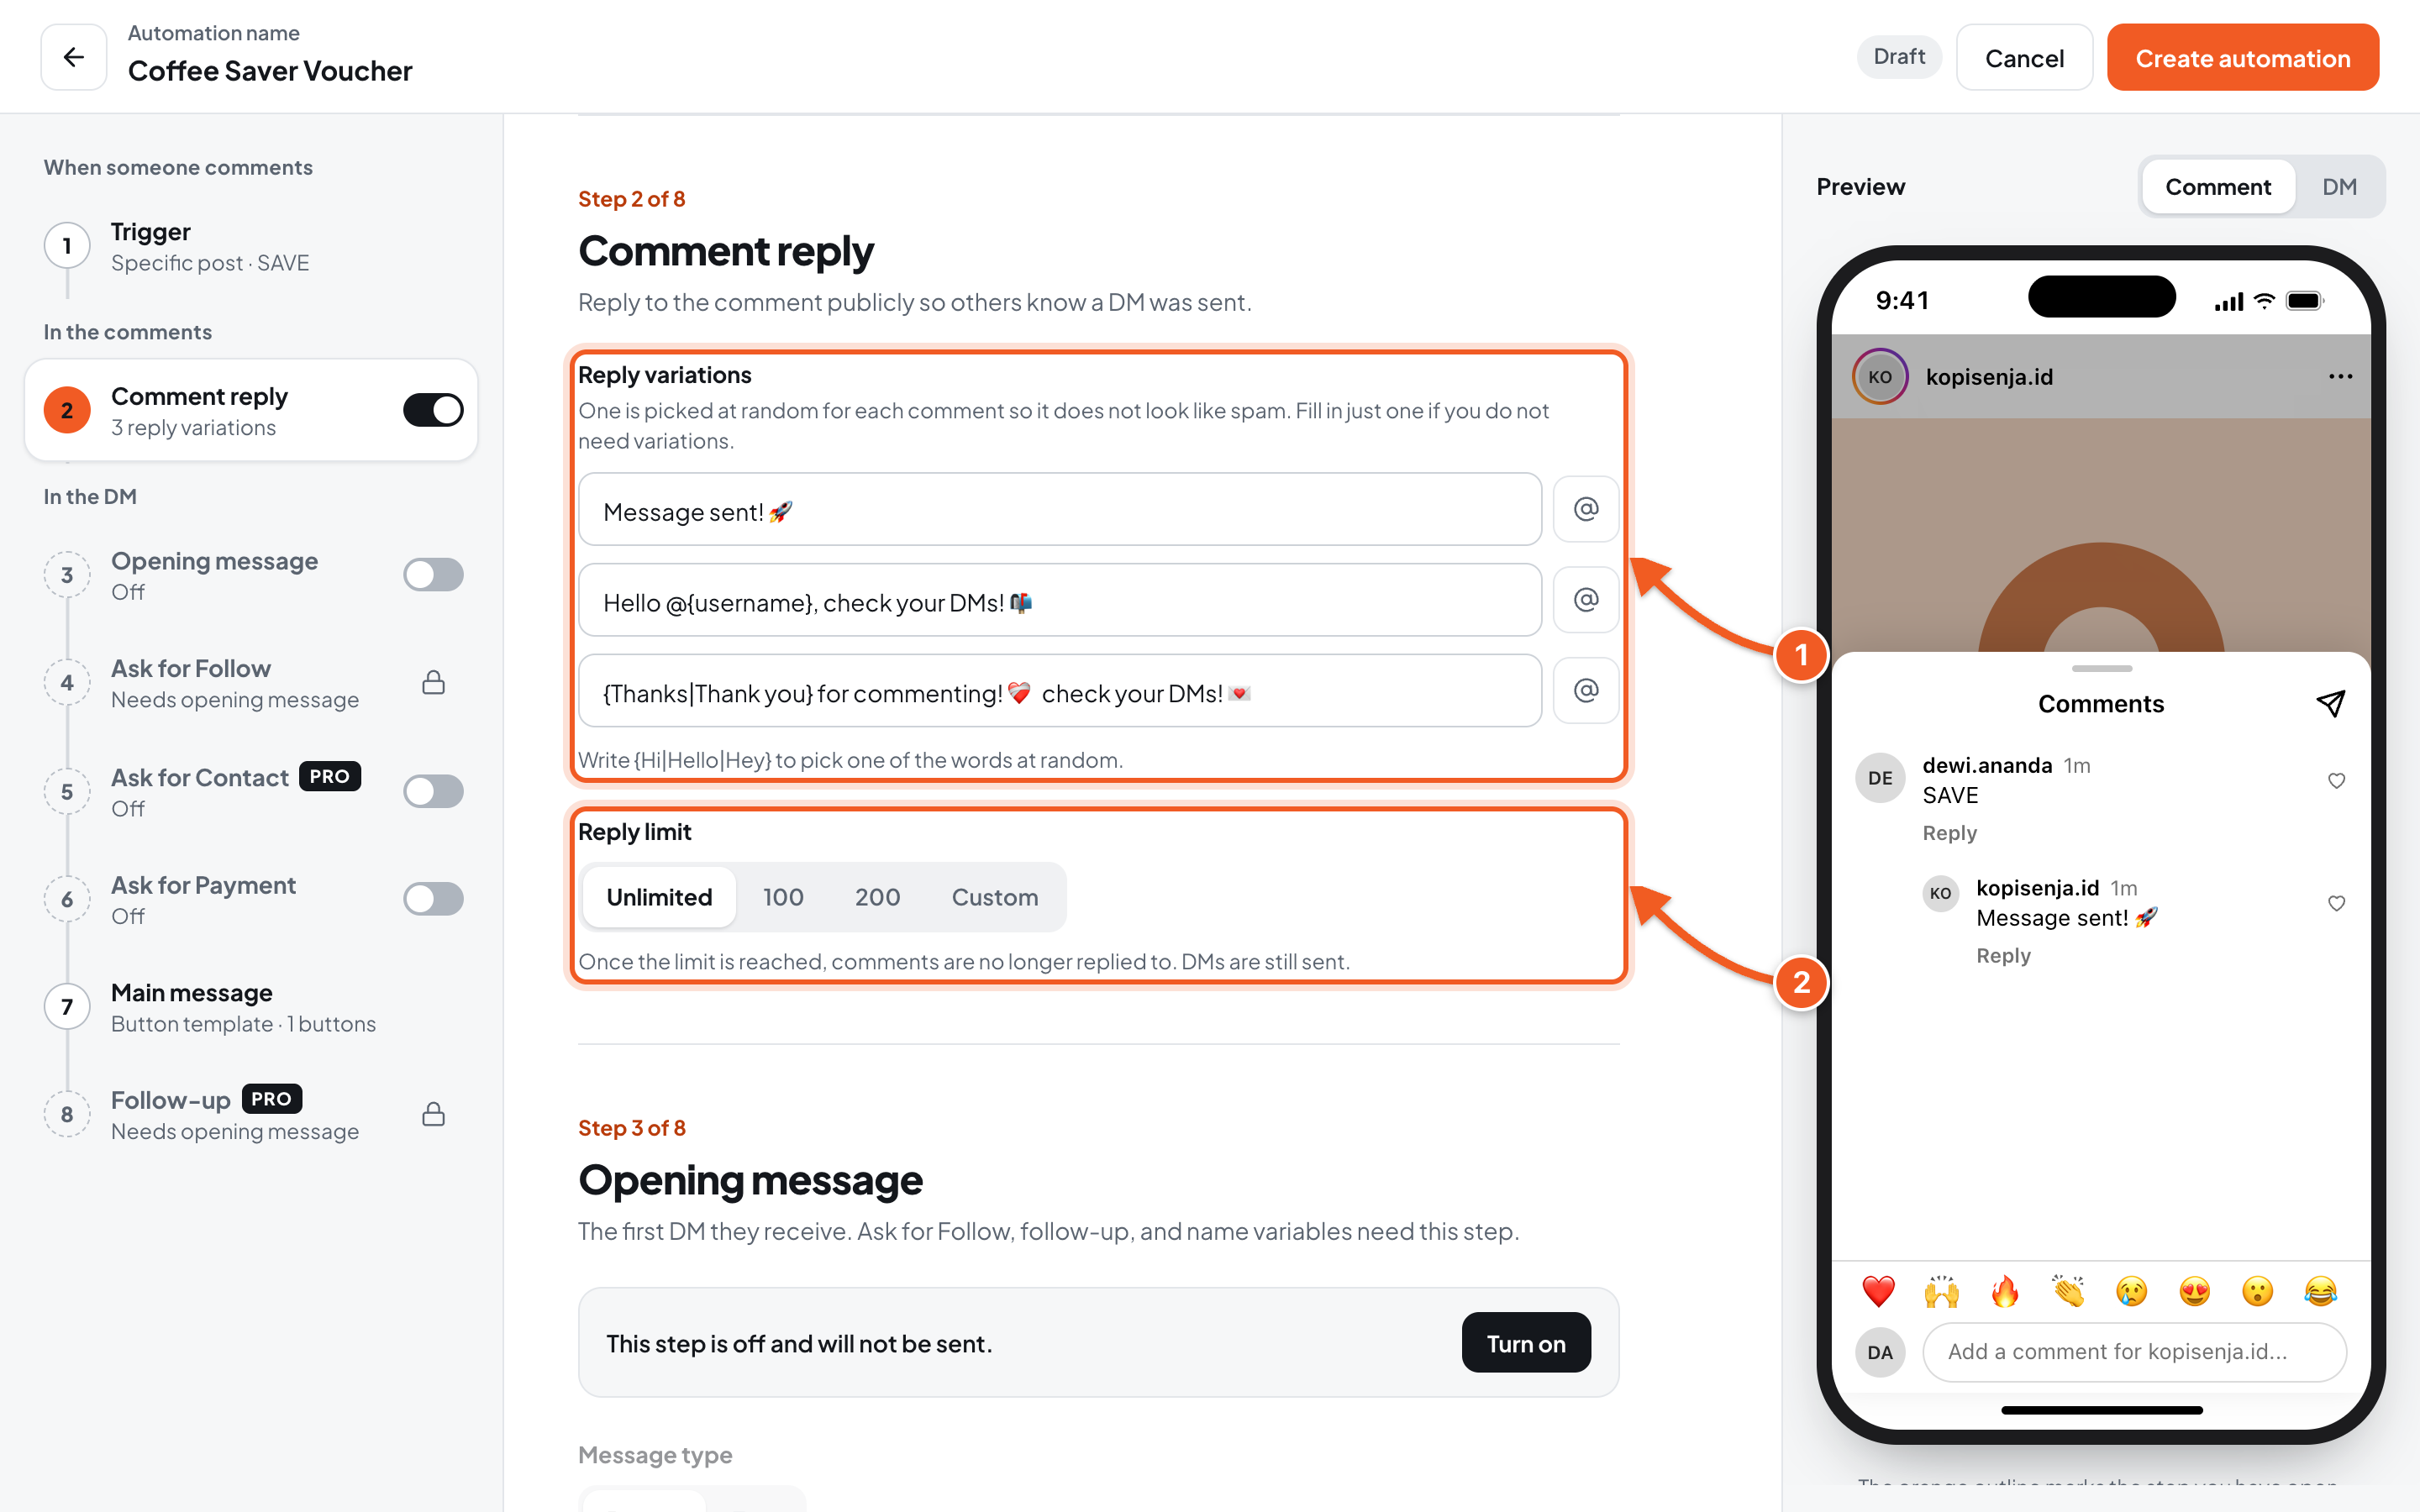
- Reply variations: one reply is picked at random for each comment, so it doesn't look like spam. Click the @ icon to insert an @mention, or write
{Hi|Hello|Hey}to pick one of the words at random. - Reply limit: once the limit is reached, comments are no longer replied to, but DMs are still sent.
Don't want to reply in the comments? Turn off the Comment reply switch in the step list.
6. Turn on the Opening message
The Opening message is the first DM people receive, with one button (or one quick reply if the type is Text). The next message is only sent after your audience taps it. Ask for Follow, Follow-up, and name variables need this step.
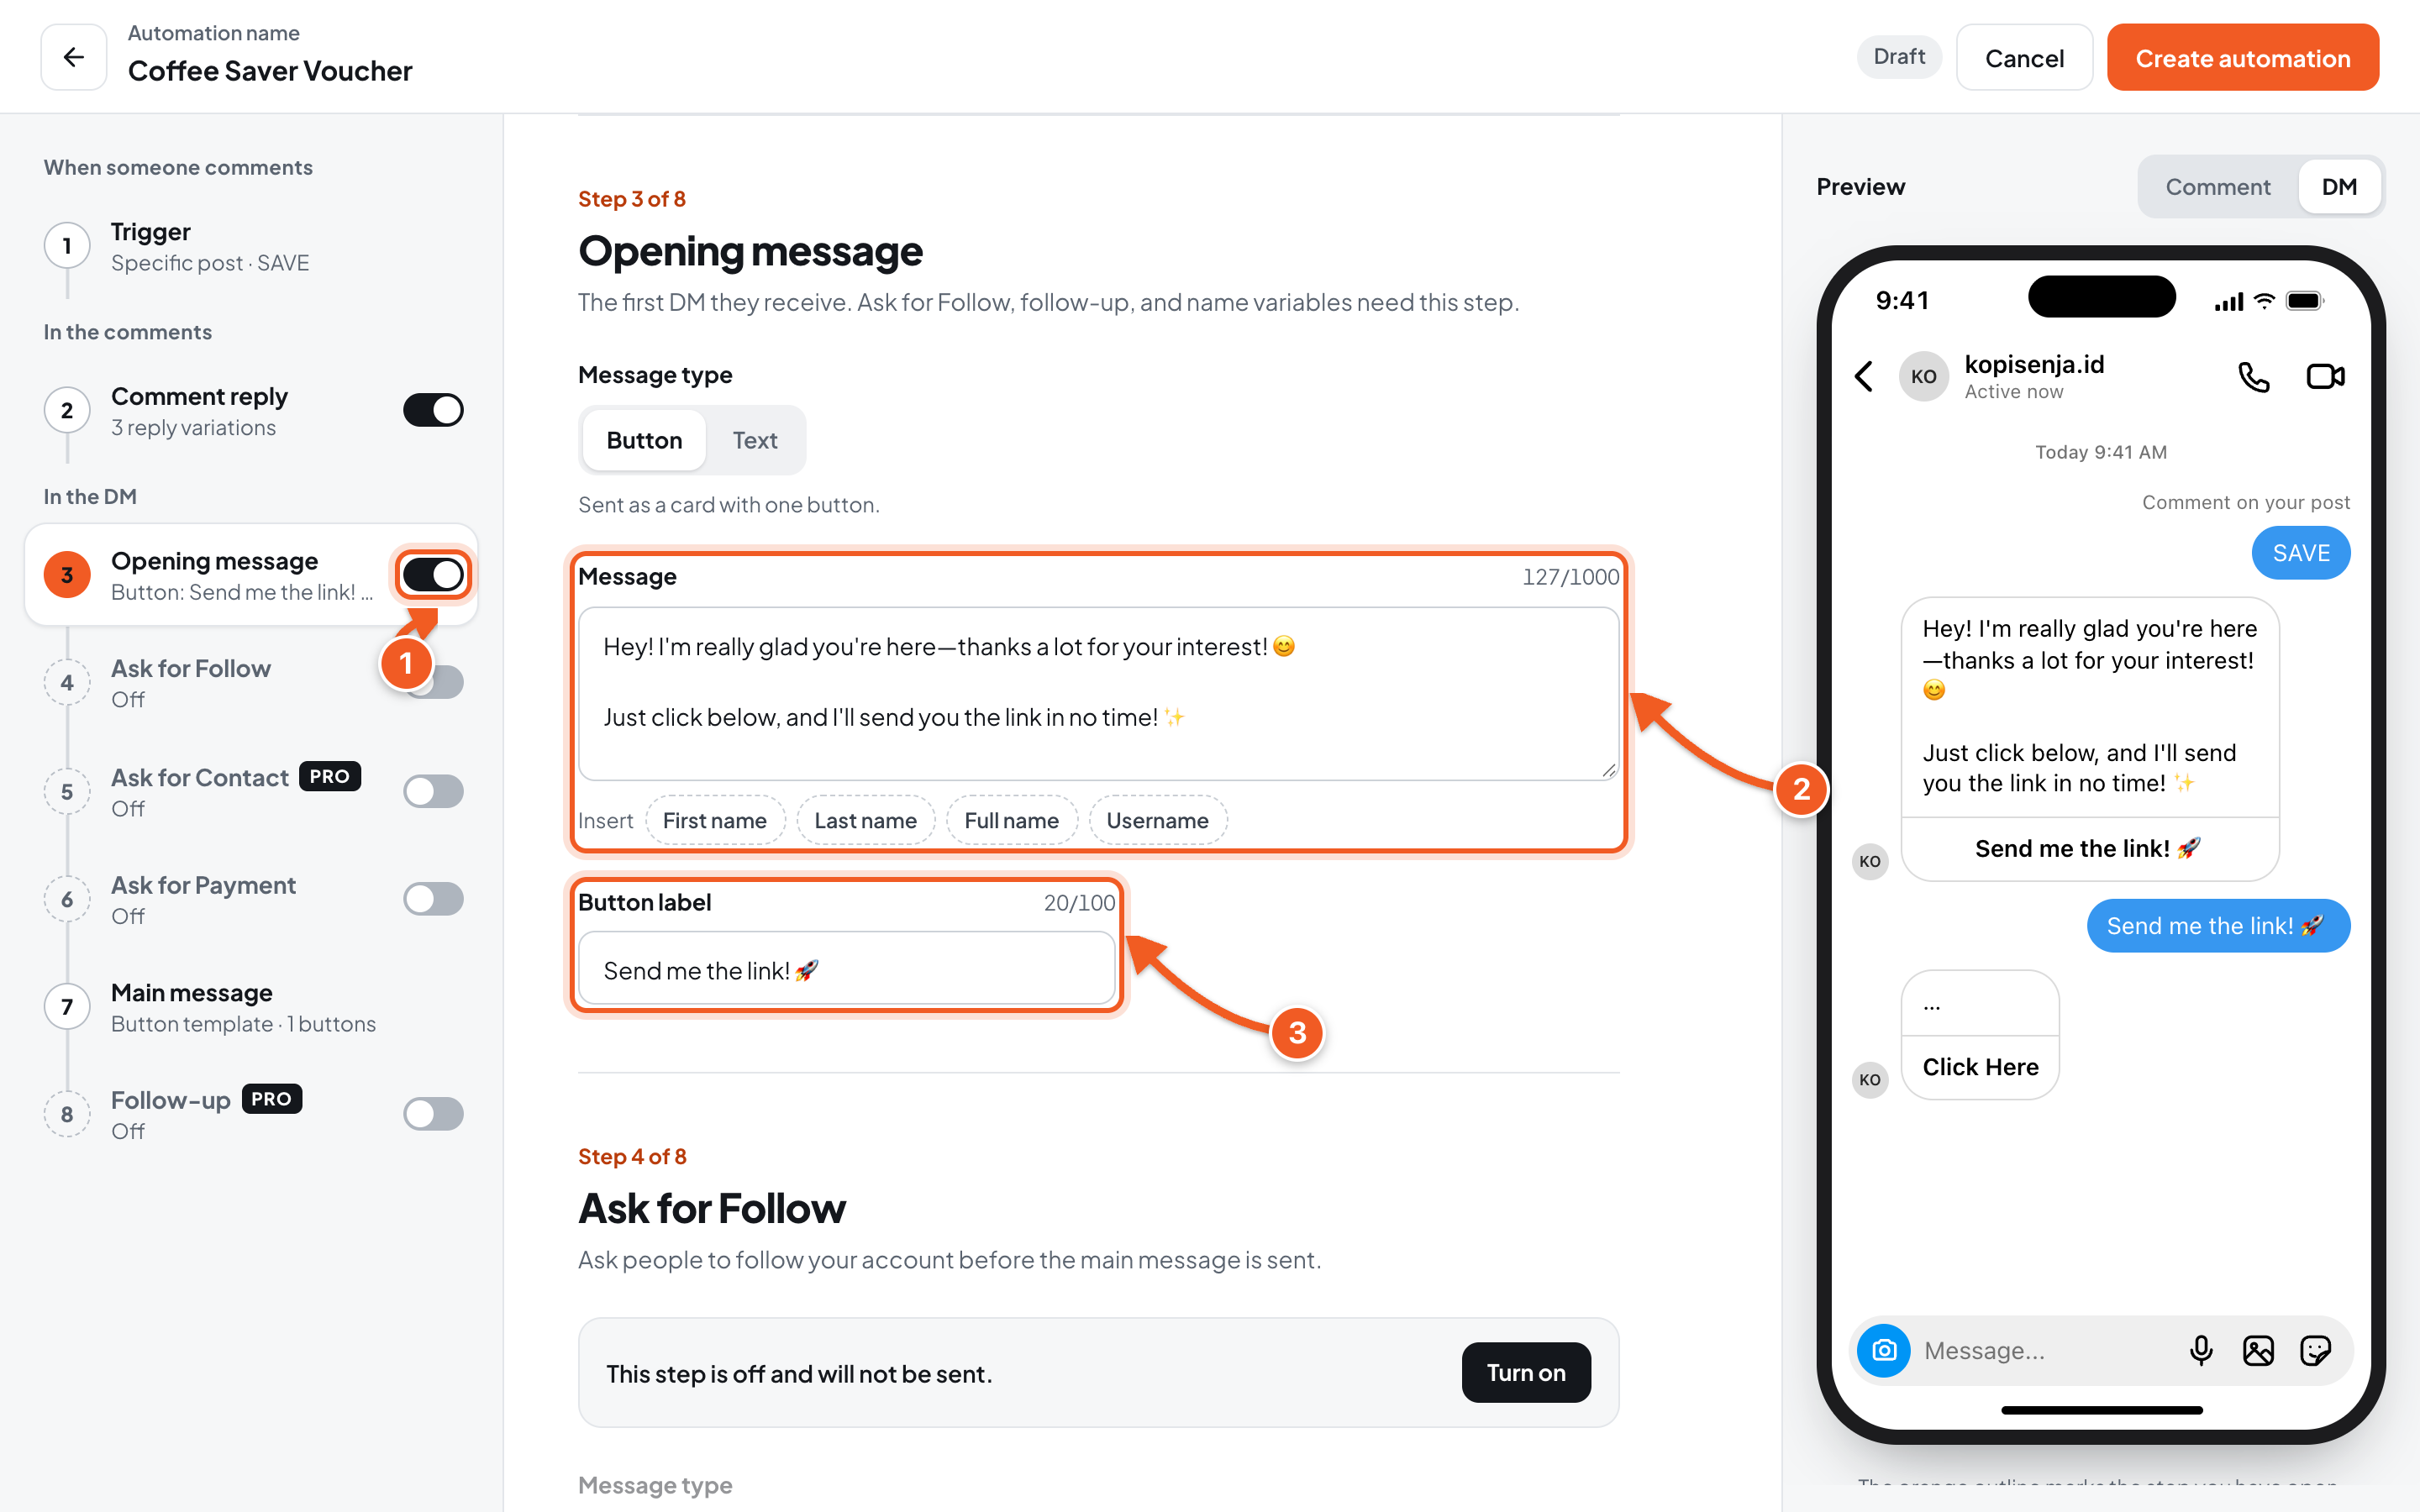
- Turn on the Opening message switch in the step list, then click the step.
- Message: edit the text if you like.
- Button label: the text on the button your audience taps, for example Send me the link! 🚀
7. Write the Main message
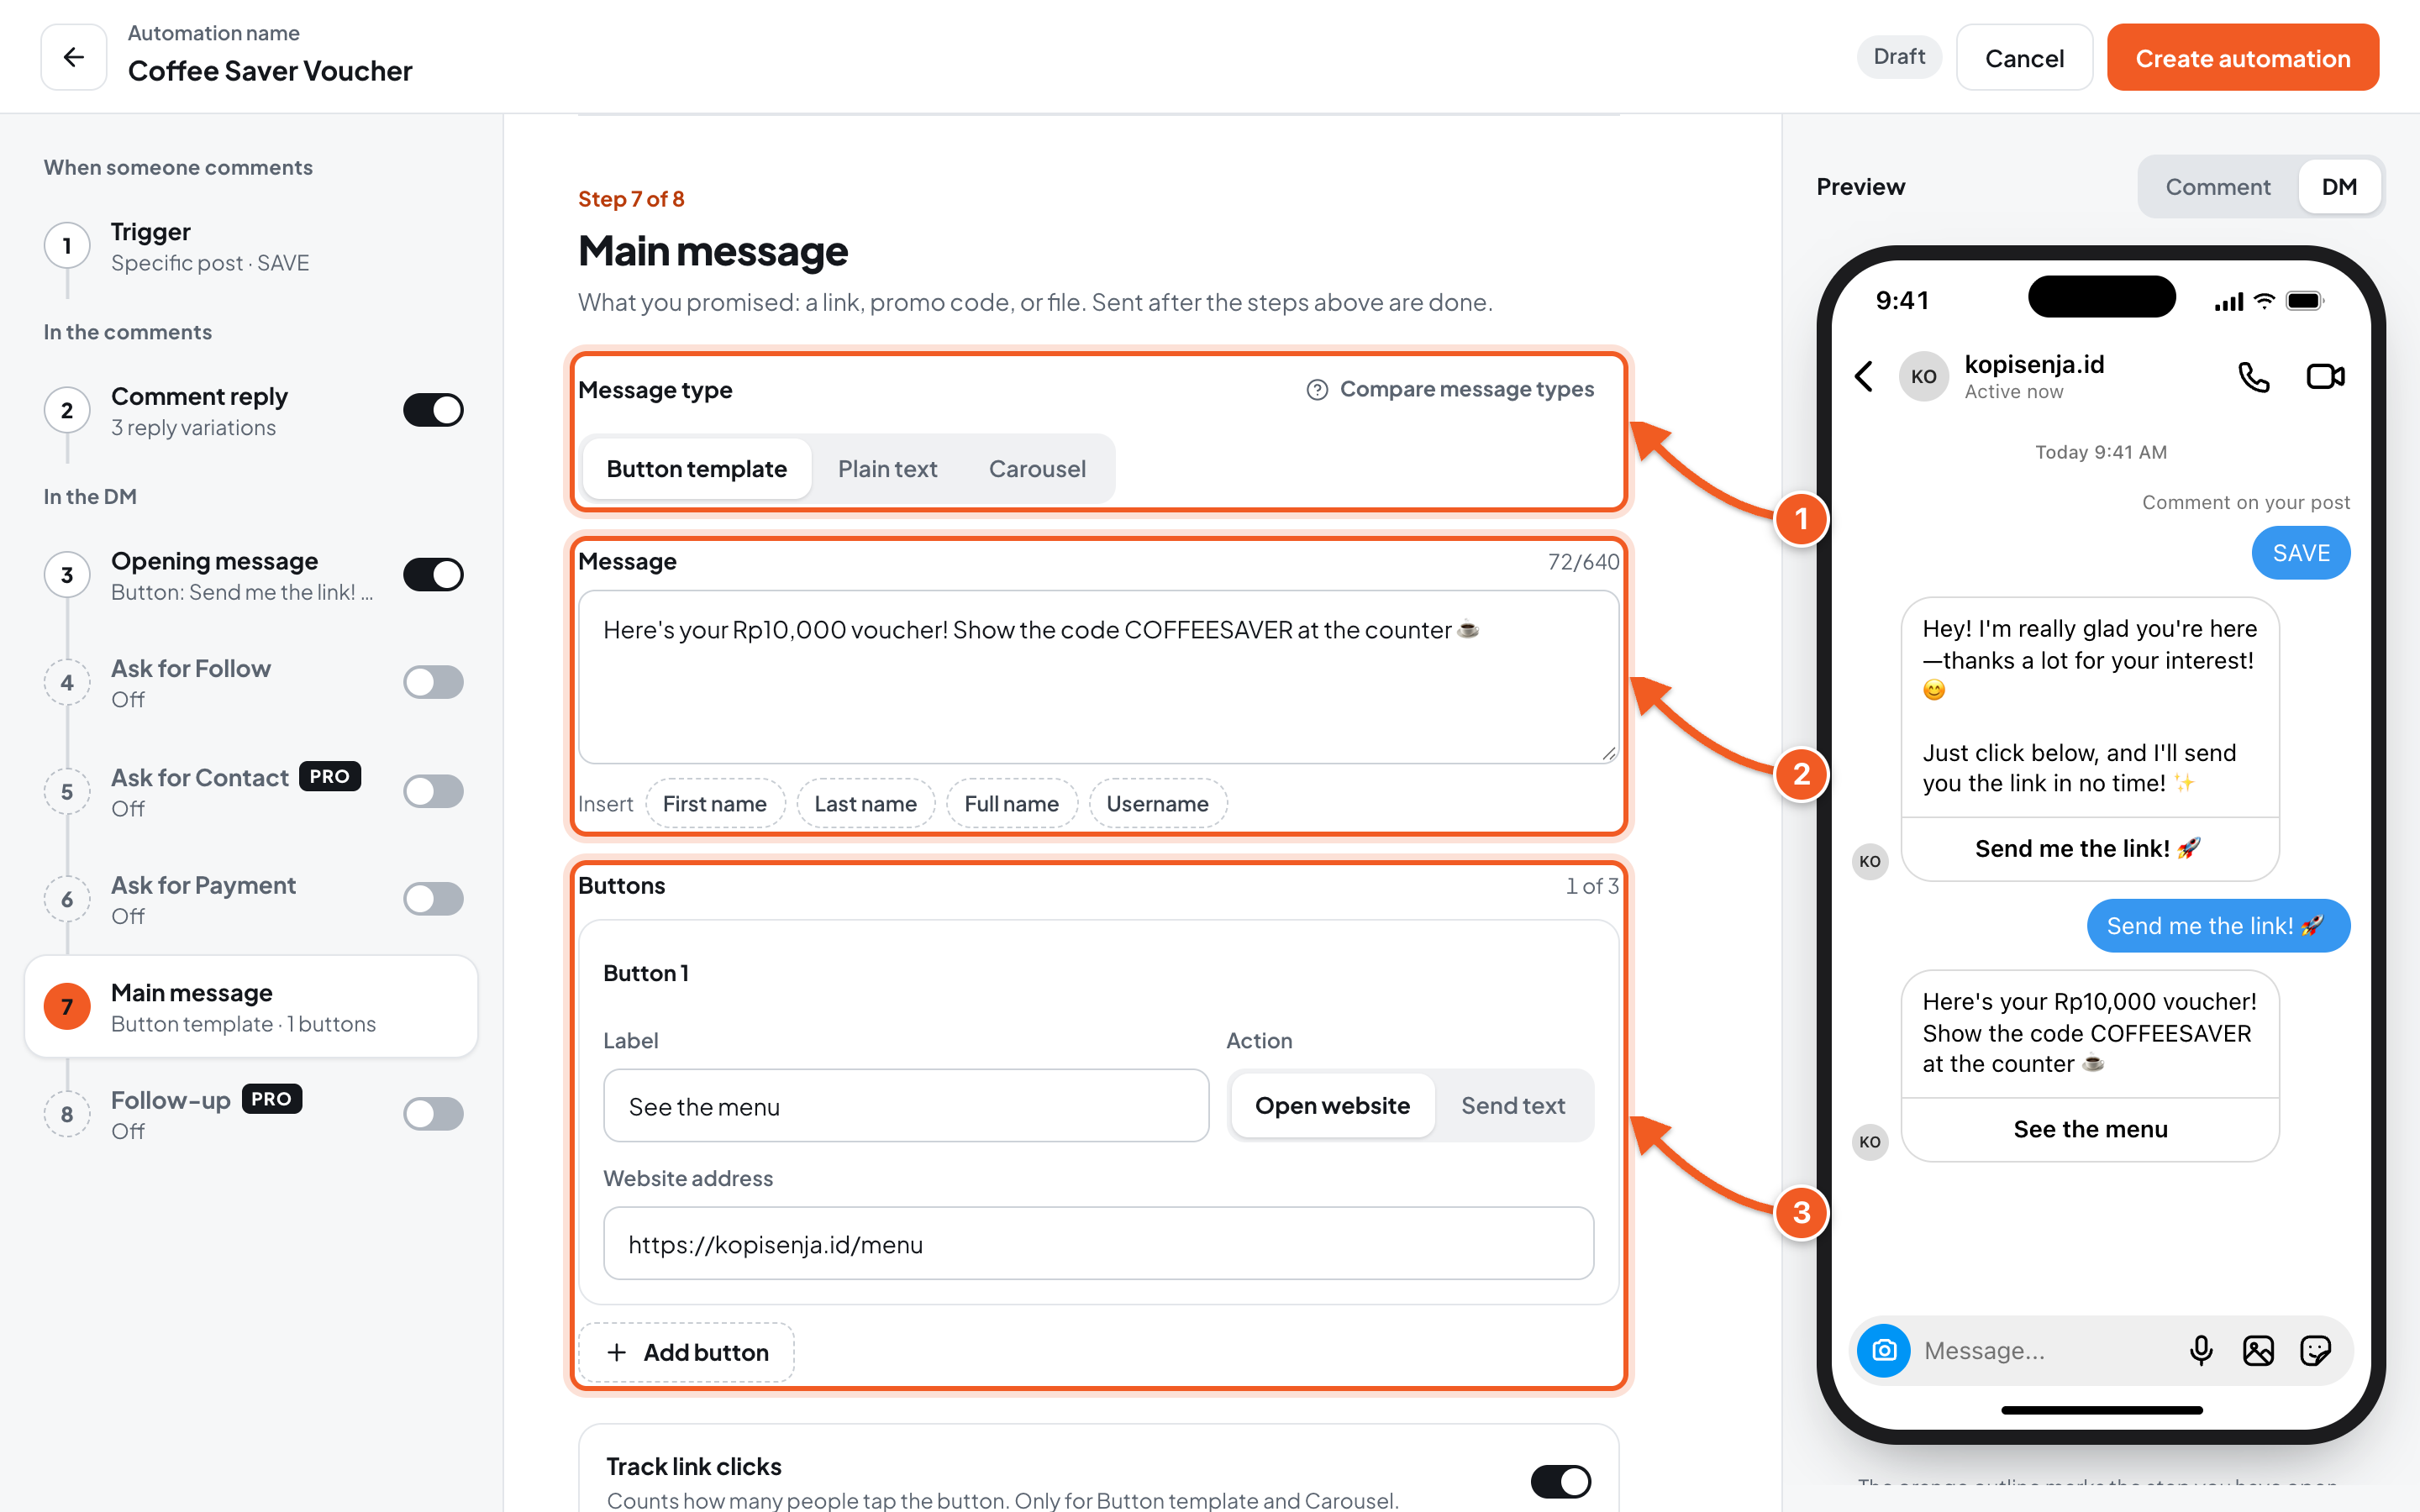
The Main message holds what you promised: a link, a promo code, or a file.
-
Message type:
- Button template: a card with buttons. Button clicks are counted in your stats, but it doesn't show on Instagram for desktop or in mobile browsers.
- Plain text: links can be clicked on every device, but clicks aren't counted in your stats.
- Carousel: several slides with images, each with buttons.
Click Compare message types for the full comparison.
-
Message: write the content. Click First name or another variable under Insert to include your audience's name.
-
Buttons: fill in the Label, choose Open website, then fill in the Website address. Click Add button if you need more than one (up to 3).
💡 Ask for Follow, Ask for Contact, Ask for Payment, and Follow-up can be turned on between the Opening message and the Main message. They're explained in Extra Steps and Ask for Payment.
8. Save
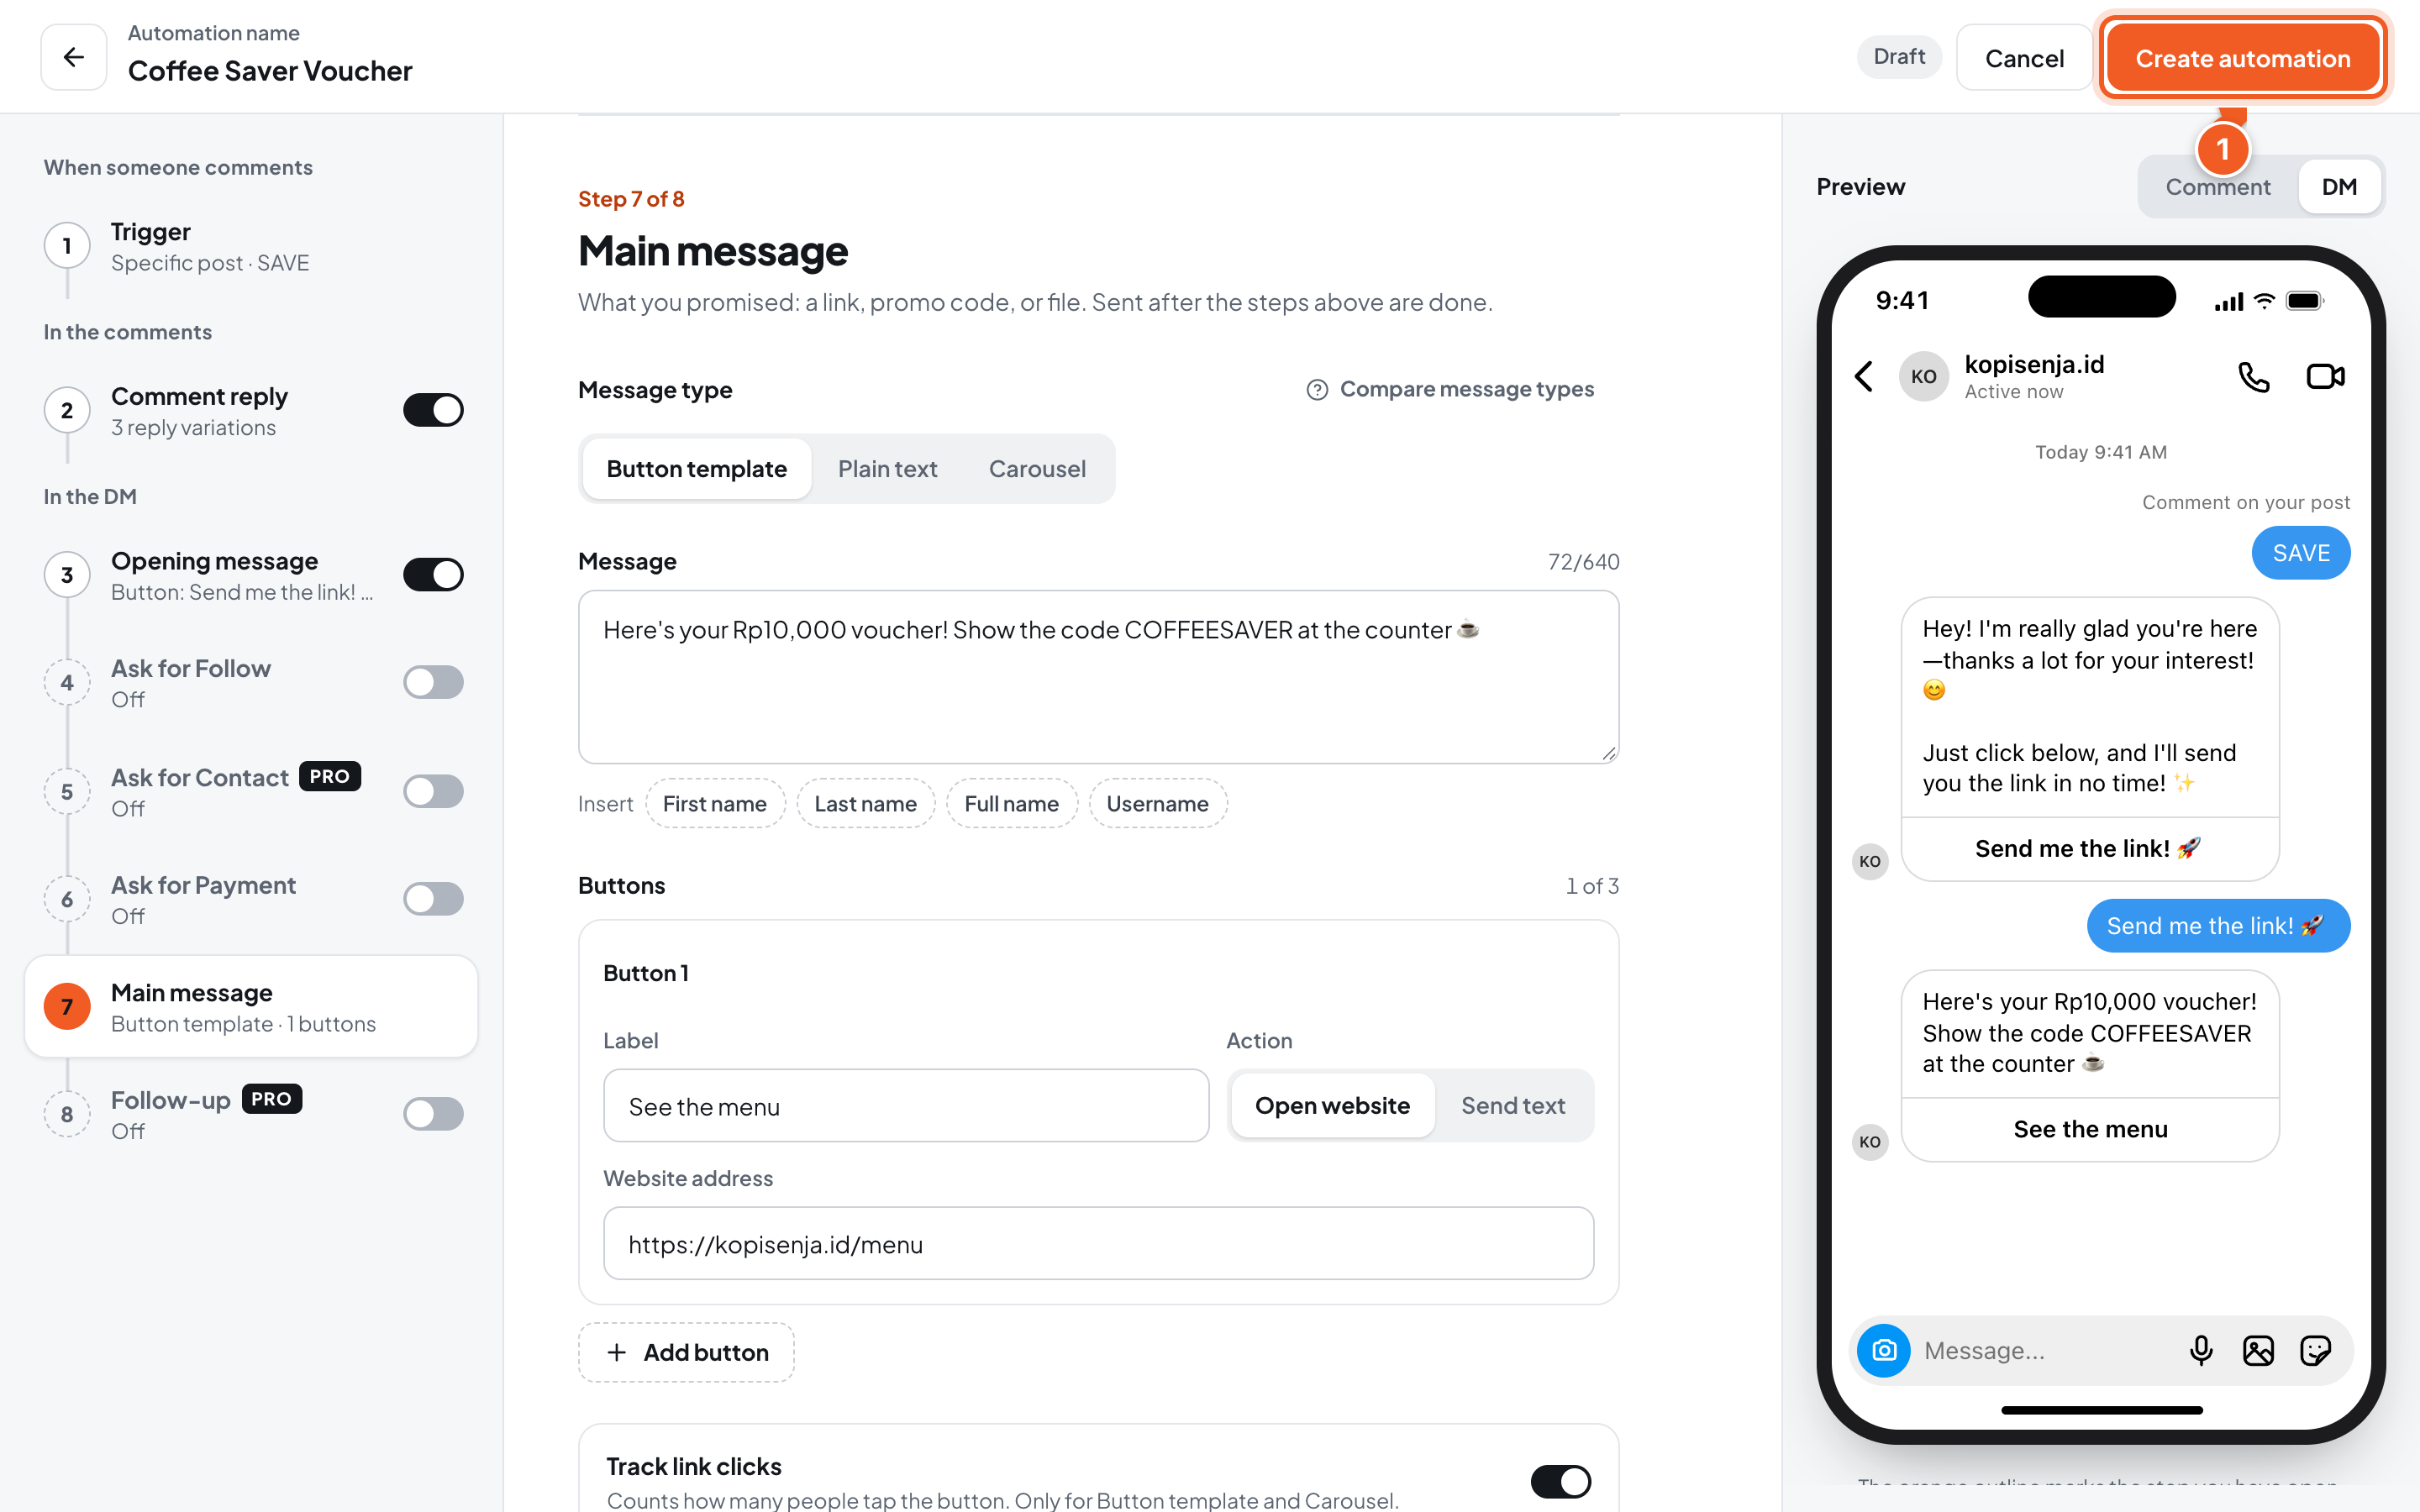
- Check the DM tab in the preview, then click Create automation.
If a step is incomplete, it's marked in red with Needs fixing. Fix it, then click Create automation again.
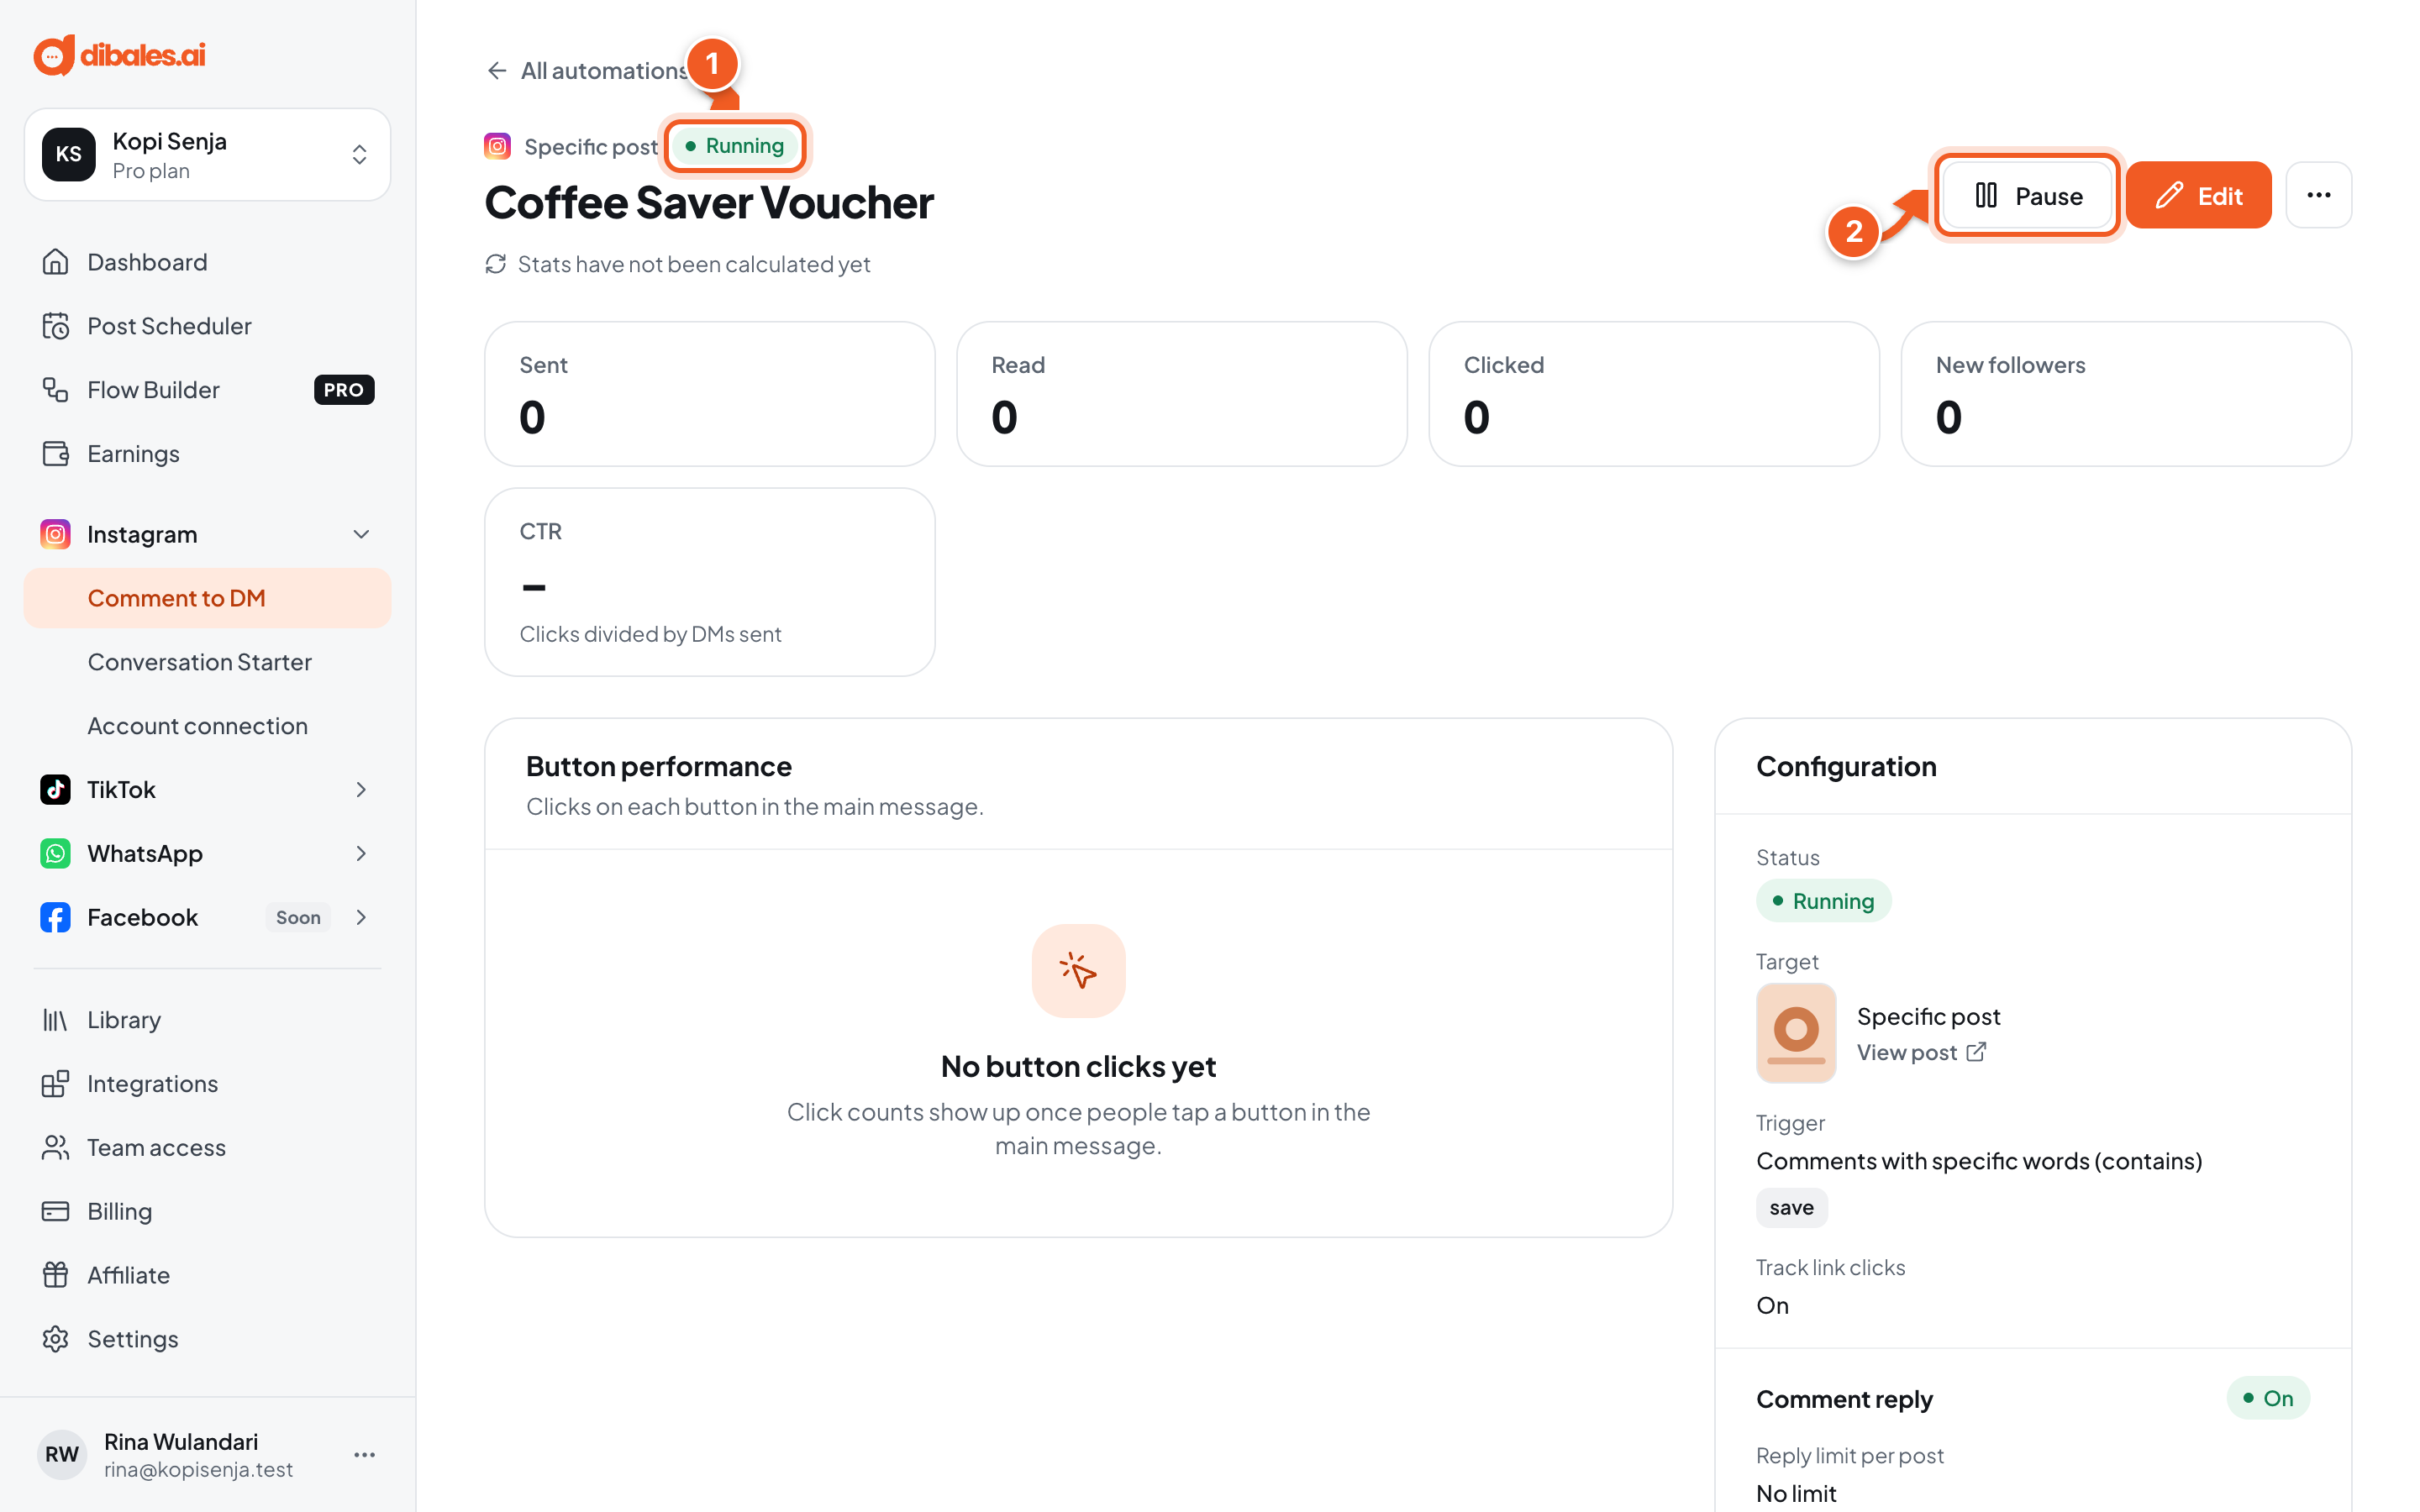
- The automation starts right away, marked Running.
- Pause stops the automation for now, and Edit opens the editor again.
9. Try the automation
- From another Instagram account, open the post and write a comment with the keyword, for example SAVE. Write it as a new comment, not as a reply to someone else's comment.
- On the account that commented, check the DM. If that account has never chatted with yours, the DM lands in message requests. Also check the reply under the comment.
- In the dashboard, click the automation's name to open its detail page, then scroll to the Comment log.
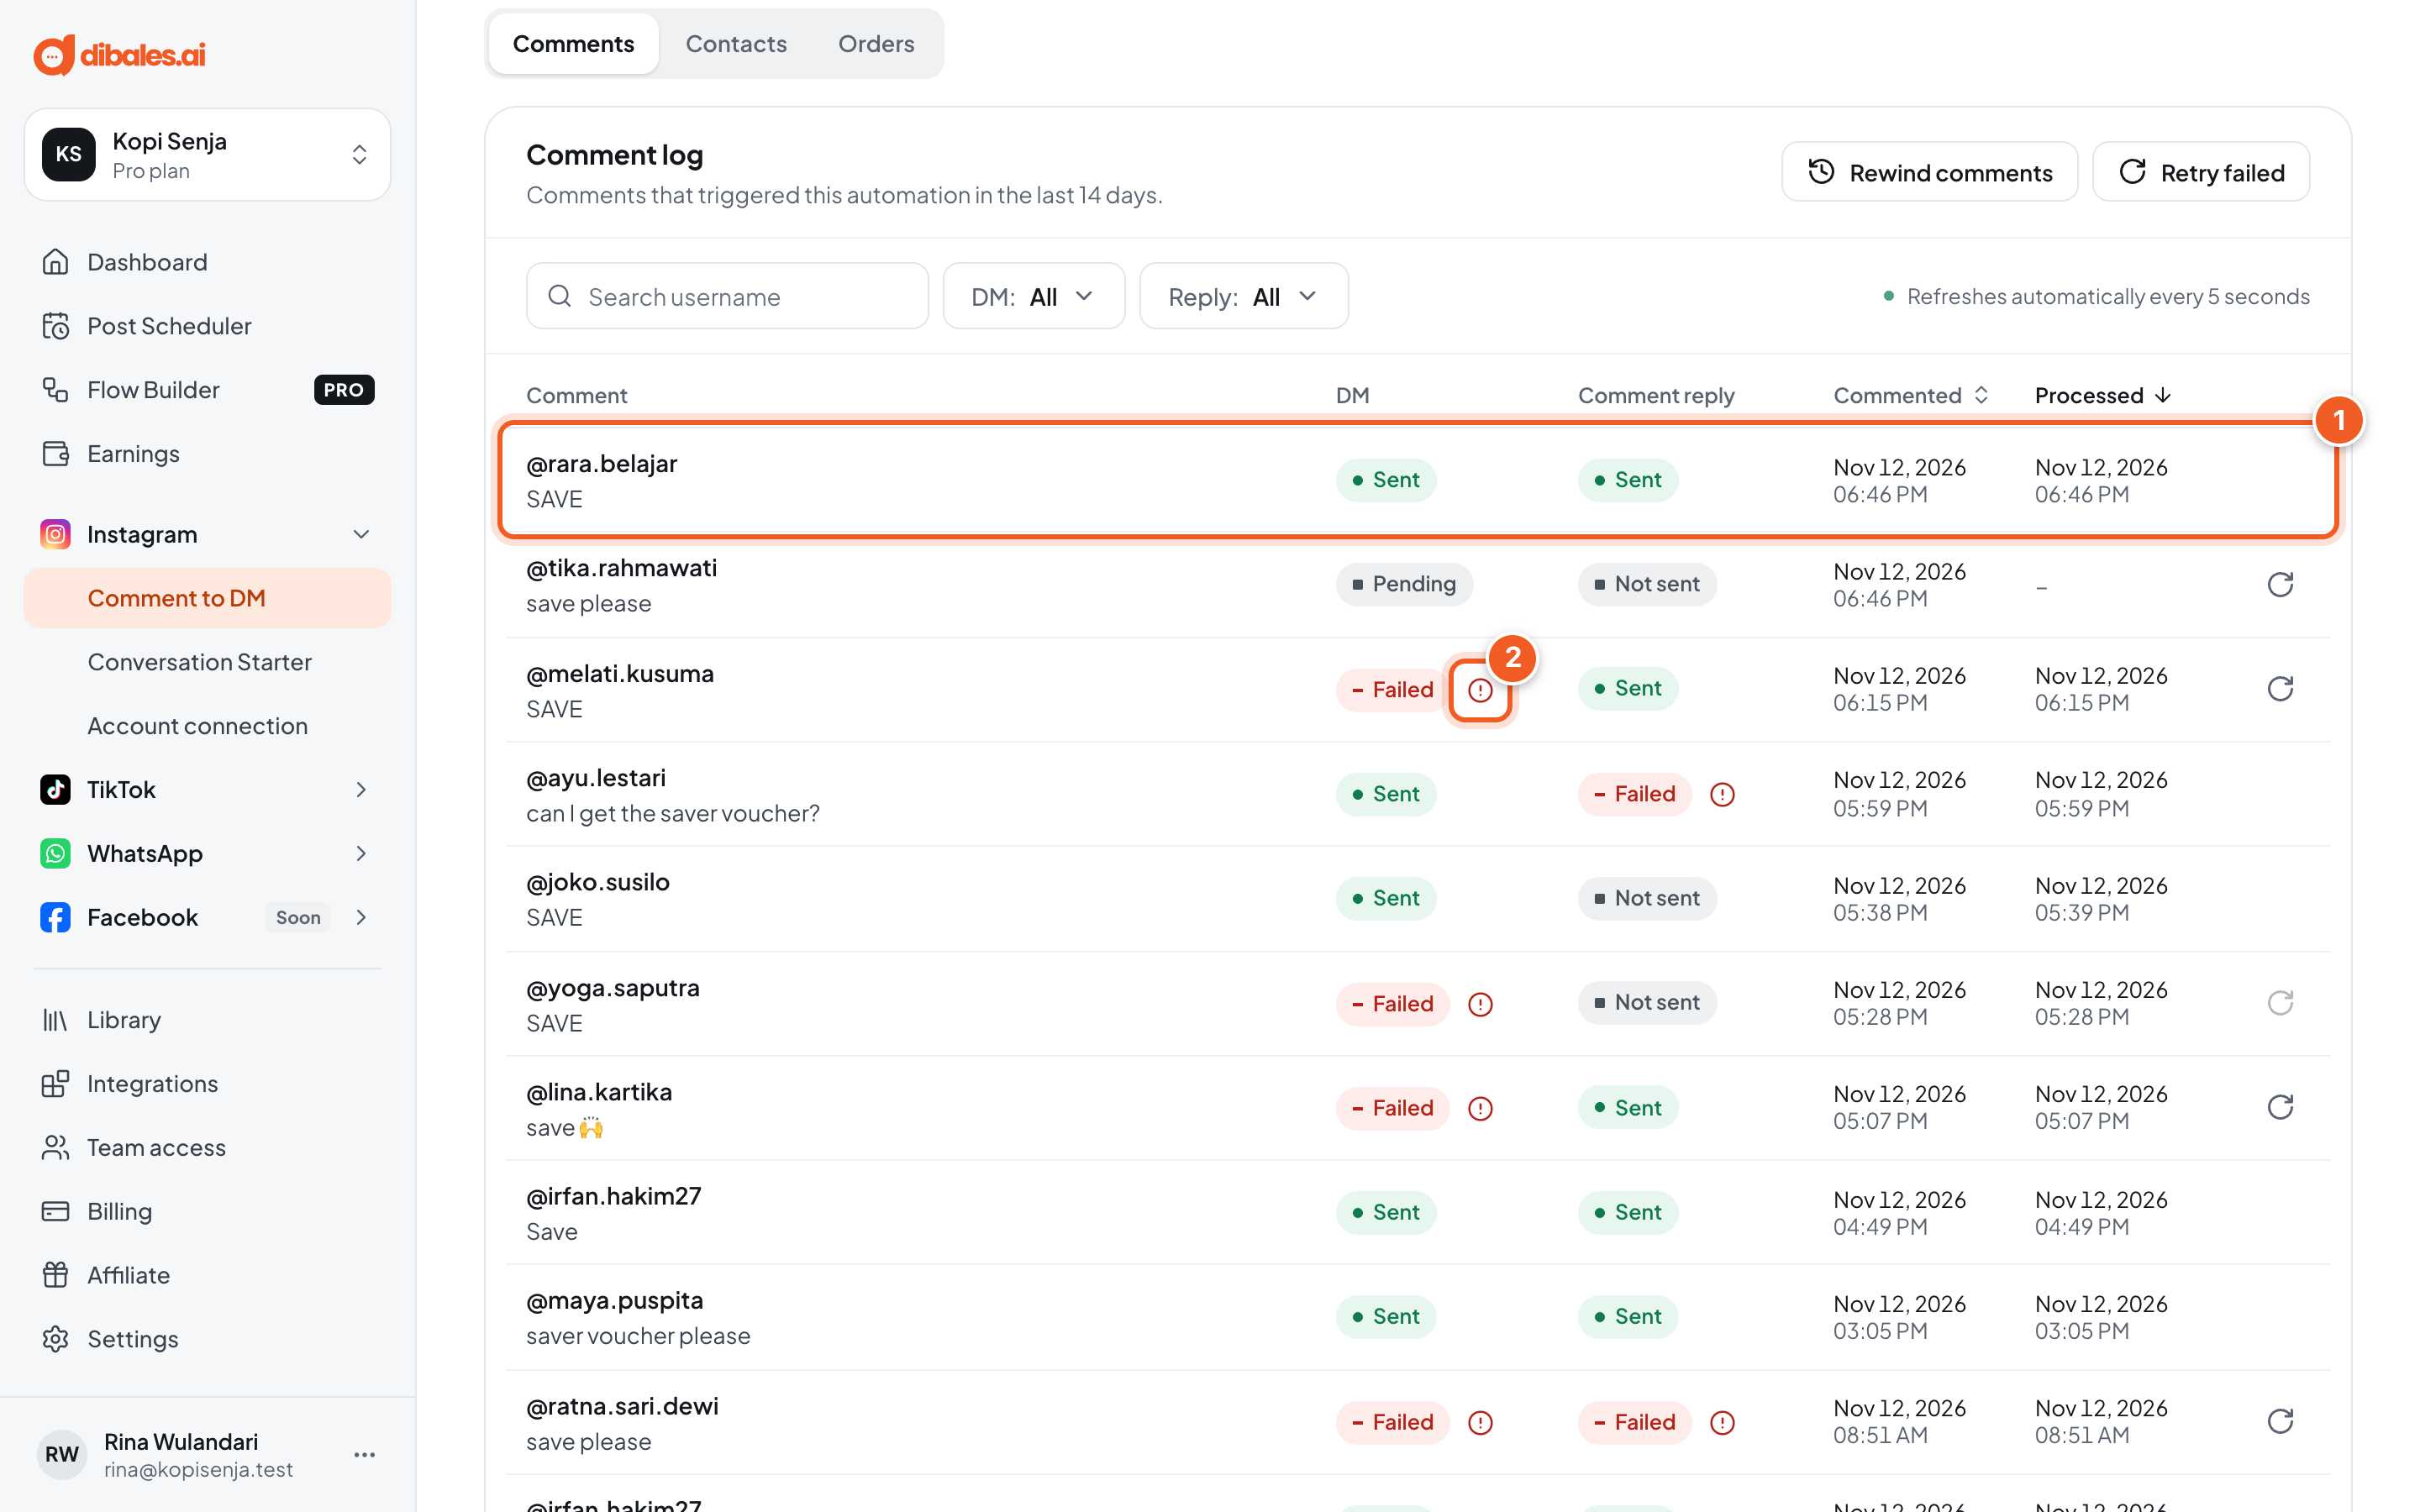
- The test comment (in this example SAVE from @rara.belajar) shows up in the log, usually within a few seconds. DM and Comment reply say Sent when they worked. Other statuses:
- Pending (only in the DM column): the DM is being processed.
- Not sent (in the Comment reply column): no comment reply was sent for that comment, for example because the Comment reply step is off or the Reply limit was reached. It doesn't mean something failed.
- If a status says Failed, click the icon next to it to see why.
Only top-level comments on the post trigger the automation. Replies to other people's comments don't count.
Stats, contacts, orders, and how to resend failed ones are explained in Manage Automations.
Troubleshooting
| Problem | Fix |
|---|---|
| The test comment doesn't show up in the log | Make sure you commented from another account, on the post chosen in the Trigger, as a top-level comment, and that the keyword fits the Match rule. Also check the automation is Running, not paused. |
| The log says Sent, but the DM isn't visible on the phone | Check message requests on the account that commented. If the button doesn't show after accepting, see DM sent but not showing on the audience's phone. |
| DM or Comment reply says Failed | Click the icon next to the status to see why. Once it's fixed, resend with the ↻ icon at the end of the row (while the comment is less than 24 hours old). |
| The comment got a reply but no DM, or the other way round | Check the step switches in the editor. Comment reply can be turned off on its own, and replies stop once the Reply limit is reached, while DMs keep being sent. |
| Comments from before the automation was created got no reply | Automations only handle new comments. On the Pro plan, comments from the last 7 days can be processed again with Rewind comments, see Manage Automations. |
| You can't save: Needs fixing | Open the step marked in red, fill it in, then click Create automation again. |
Want more?
- Other sources: story replies, story mentions, comments during a Live, or DMs with a keyword. See Story, Live & DM.
- Ask for a follow, collect contacts, or send follow-up messages: see Extra Steps.
- Take payments right in the DM: see Ask for Payment.
- Branching flows (Pro): see Flow Builder.